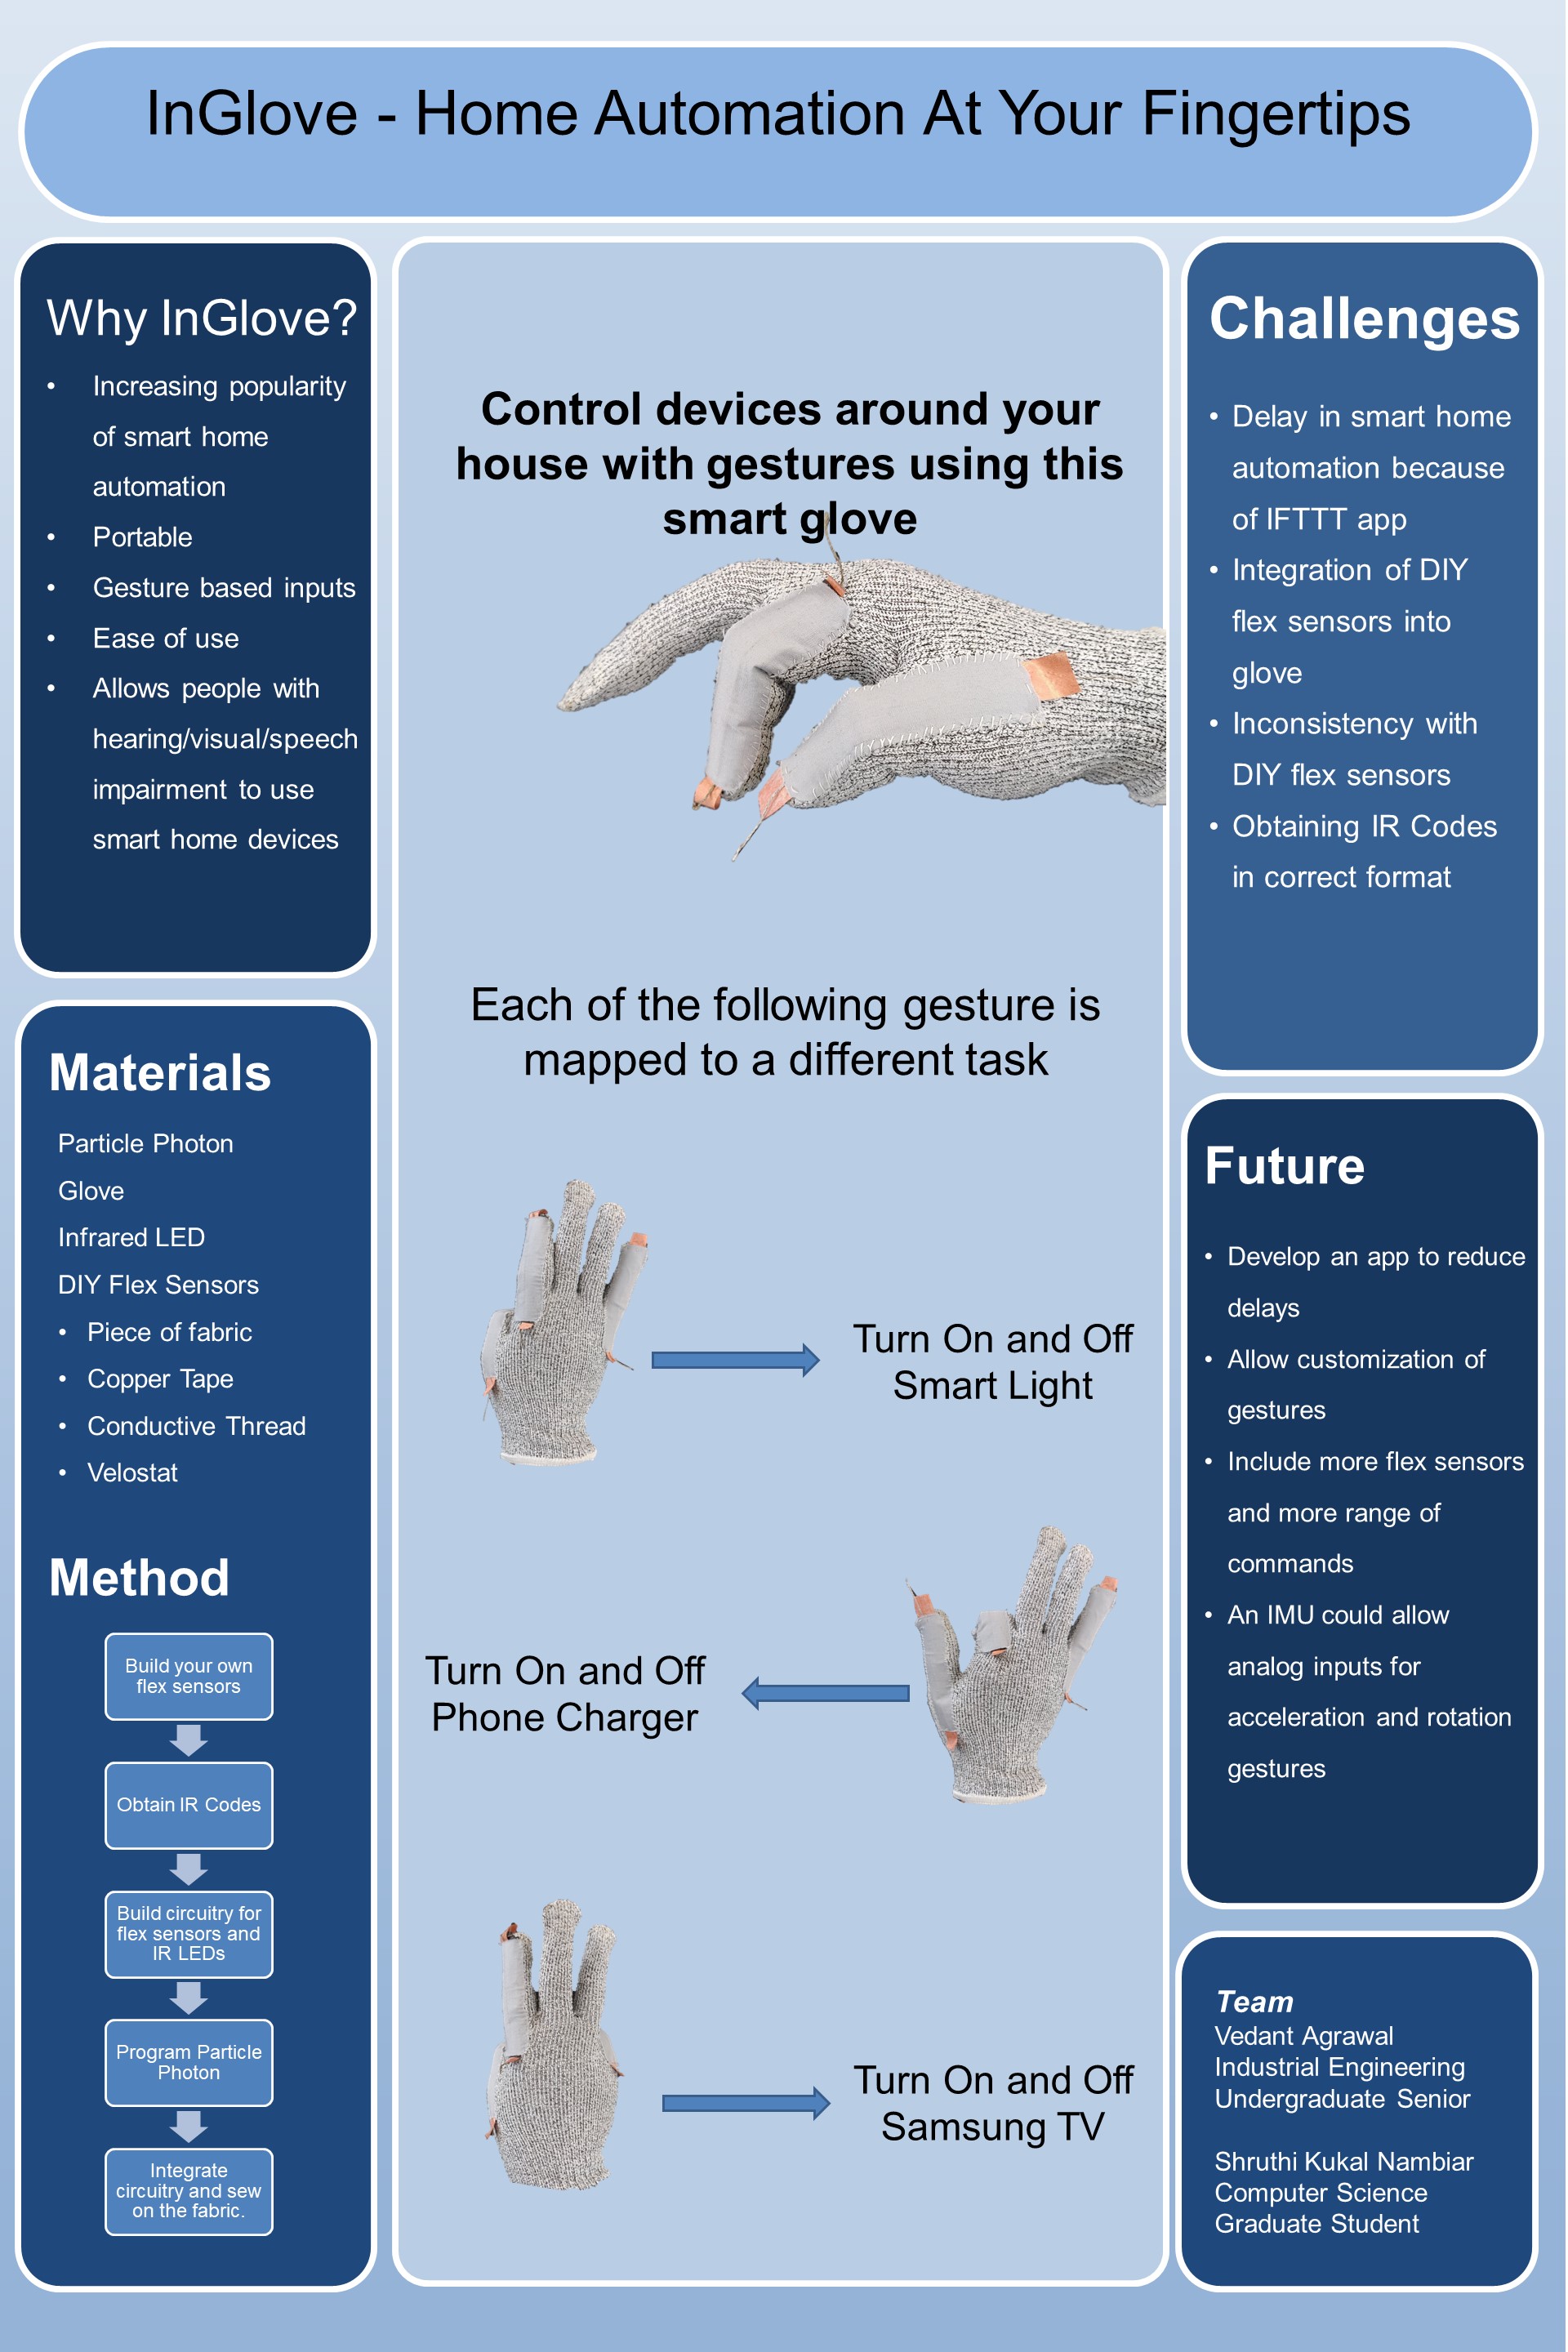
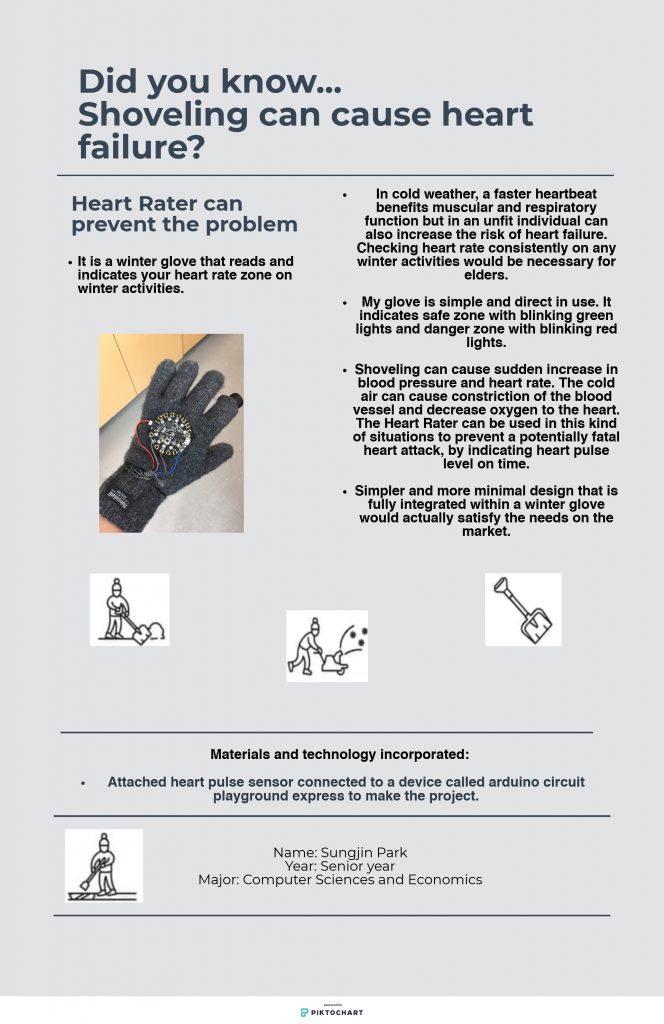
Final Project Reflections

First for everyone
What are your personal thoughts and feelings about your finished project?

My personal thoughts on my project are that it is very cool. It does exactly what I was hoping it would. Also it has given me a cool project to work on in the summer when I have free time.

What are they greatest strides you made in this course?

I think my greatest strides in this course where in the non computer side, which would be sewing. I now understand some many little things about sewing that I didn’t know before. Whether it be from using the sewing machine to hand sewing or techniques to help sew better and more efficient.

What else do you wish you would have learned? 

I wish I would have been able to play around with micro controllers a little more and learn a little more about it, but my project didn’t have any use for it. Other than that I cant think of anything. I think the course/project exposed me to many new things and it was fun learning different stuff.

What could have made your project better?

If I would have been able to integrate more of the charging unit directly into the pocket. But with the amount of time and first time doing this type of project I am happy even without that.

Final Project Post: Qi Jeans

Qi Jeans

Project team:

Gregg Van Dycke

One sentence that describes your project:

Jeans designed with a special pocket for wireless charging capabilities.

Video:

Final Poster:

Describe what your project does and how it works:

My project uses inductive charging to wirelessly charge a phone while it is in the pocket of a pair of jeans. There are 3 main parts to the design. The first is the battery pack with built in wireless charging transmitter. The second is the phone or device itself and the last is the pocket for the transmitter as well as the pocket that restricts the phones movement in the jeans.  The transmitter creates an alternating electromagnetic field that the phones wireless receiver can convert into electricity to charge the phone. The pocket is designed to keep the wireless transmitter and the phones wireless receiver as close as possible. Doing this allows the unit to function with a higher efficiency.

Describe your overall feelings on your project. Are you pleased, disappointed, etc.?

I am very pleased with my project and the way it turned out. Although the project was not very technique from a CS perspective, I feel that it does exactly what I wanted it to do. I was able to learn new skills while doing the project such as sewing. I also was able to remove parts from my design that would have made my project more cumbersome and harder to build, specifically using parts from adafruit to build something that already exists. The jeans function very well and are still surprisingly comfortable to wear.

Describe how well did your project meet your original project description and goals.

It met my original designs very well. It does exactly what I set out to do and that was create a pocket in a pair of jeans that could provide wireless charging capabilities. While I did change some of the ways I constructed/built the project the overall concept and final product is exactly what I wanted.

Describe the largest hurdles you encountered.  How did you overcome these challenges?

Some of the hurdles that I encountered were when deciding if I should try and build my own wireless charging unit or buy one that functions well. I first tried to build my own with parts from adafruit and sparkfun but found out quickly that it was far more cumbersome and less reliable then using an already built charging unit. So I did some research and found a well built and highly rated portable wireless charger that I thought would work well with my project design. My other hurdles were in the construction of the pockets themselves. I first tried to build my own pockets which proved to be very challenging. It was the first time I really had to sew something completely from scratch.  While attempting to build my own pockets I found out the order in which you sew something is very important. When trying to sew my two mock pockets I messed up a couple of times trying to figure out the correct order in which what parts should be done first. In the end this didn’t matter that much because I ended up using the pockets that were in the jeans and made modifications to the to complete my design.

Describe what would you do next if you had more time

If I had more time I would have defiantly liked to have made improvements to my design. The first is reducing the overall size of the charging unit. The second would be to remove all heavy and bulky parts from the pocket, only keeping the wireless charging coil in the pocket. I would have also liked to look into smaller and lighter battery technology as well as using a conductive thread to implement the transmitter directly into the pocket.

List the final materials used in your project

  • Wireless Portable Charger, 10,000 mAh Power Bank Qi Battery Charger. Link to charger
  • Men’s Lee Extreme Motion Stretch Straight Jeans. Link to jeans
  • Fabric from class that is used in pocket construction.

Final Project Post: Scavenger Stuffs

Scavenger Stuffs

Savannah Mann

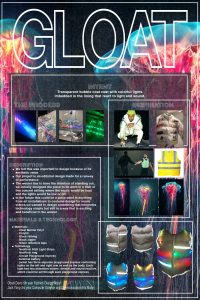
A mobile game based around scanning pendants against hidden stuffed animals to collect characters in-game

Poster

Describe what your project does and how it works

Scavenger Stuffs was built around the idea to make wearable technology cheap and accessible. By pairing a medium expense, a free mobile app, and a $1 player pendant together, the entire game helps create a unique and fun twist on scavenger hunts.

The stuffed animals are intended to be bought at-cost for manufacturing ($20-$30) by local business, or donated to libraries and museums. Each stuffed animal is a standalone unit in the game, complete with its own unique design in real life, and in the mobile app.

Once a player finds a location which distributes pendants (Decorative tags which cost <$1 to create), they use the pendant to register for an account on the mobile game. From that point on, players can scan their pendants against any stuffed animal they find, and it will be added to their game’s account.

Scavenger Stuffs’ goal is to bring wearable technology down to a more accessible level, and to help get everyone exploring.

Describe your overall feelings on your project. Are you pleased, disappointed, etc.?

Not only is the product completely functional, but the overall plushie design and app exceeded my expectations for what would be done by the end of the semester. The game is consistently  working, easy to manage, and involved a great deal of work that was planned well and executed clearly. Overall, this was a very complicated project that succeeded thanks to a great deal of initial research and rigid goals.

Describe how well did your project meet your original project description and goals. 

This project both meets and exceeds the initial concept. The idea to have an RFID-based scavenger hunt seemed a bit difficult in terms of hardware, but ended up proving to be much simpler after soldering the pieces together. The plushie designs ended up being unique, quickly craftable, and durable, the three aspects I was hoping for in their design. As for the app itself, it proved to be almost bug-free in its late stages of development, allowing for users to recieve animals with only a 5-10 second delay from the initial scan. The app not only featured the animated animals which were not an initial requirement, but the “adventure” system was also implemented early on to add gameplay to the app.

Describe the largest hurdles you encountered.  How did you overcome these challenges? 

The biggest challenge with this project was the data-transfer between the RFID scanner to the Unity game. Initially, the plan had been to implement the backend APK from the Pi to update the server as expected, however the issue that I ran into was that there was no APK in existence for this server that ran through any executable Linux file. The workaround that I ended up making was a dummy Unity file that ran on another computer, using a Linux clone to rsync the file over then using the Unity APK for the server to update the server. It added a lot of silly, complicated steps and terminology between points A and B, but once I got the system ironed out it worked well and with managable delay. The surprising upside to all this was that I got to monitor every step of the data transfer via my SHH terminals, command line for the Linux clone, and my dummy Unity file’s custom screen. What I sacrificed in simplicity, I made up for in reliability and ability to monitor/debug.

Describe what would you do next if you had more time 

First step would be to move the stuffed animals off a local network. I’ve got a few pages of notes on some good techniques for this, but I would like to delve a bit deeper into the research before committing to one method over the other.

Next step would probably be to add a stat system to the “adventure” mode of the game to make it more challenging and to reward players for collecting new animas.

Then, I think it’s just a matter of making more stuffed animals!

List of materials:

Pendants

  • RFID Tag (Blue circle tag)
  • Sculpey White Clay
  • Acylic paint, chalk, watercolor, nail polish

Stuffed Animals

  • RFID-522 Reader/Writer
  • Raspberry Pi 0W
  • 4GB SD Card
  • Fabric & Stuffing (Polyfill + Crumpled Paper for most)

Program Components:

  • Unity (Mobile App)
  • Unity (Dummy)
  • GameSparks Server (Scavenger Stuffs Datatypes & Messaging)
  • Bash on Ubuntu for Windows10
  • RSync bashLoop.sh script
  • RFID Reader/Writer I/O initializer script

Final Project Post: Lit Lehenga

Lit Lehenga | Jessica Fernandes

Lit Lehenga is a traditional Indian garment that illuminates in darkness to mimic the magic of Diwali and celebrate Indian culture.

(Final Poster emailed due to technical difficulty adding to post.)

What/How

Lit Lehenga illuminates in darkness. It does this by a light sensor on a micro-controller that maps light levels in the environment to trigger connected LED sequins to turn on. The code configures the specific level of darkness in which the dress will proportionately brighten. The LEDs are individually attached to the garment’s top layer, embedded into the embroidery to create an integrated design aesthetic. The Circuit Playground Express connects through a small hole in the side seam into a power source stored in the pocket in the back of the skirt. When plugged into the power source, the Lehenga is in its “on” state.

Overall Feelings

This project has inspired my creativity and given me the knowledge to approach materials sourcing, problem solving, and idea-forming in a way that will support my vision. I like my project and am glad to have had the opportunity to explore my interests in design and technology while also sharing a story that is important to me.

Meeting Goals

This first iteration of my project successfully brings awareness to my culture and serves as an entry point for people to take an interest in or relate to the story I wanted to tell. I wanted to express my journey as a first-generation American finding truth in her identity in a way that makes the emotions tangible. I feel successful in my task in that the technology’s basic function works. I recognize that the execution of detail did not meet my initial expectations due to technical difficulties.

Handling Hurdles

The biggest hurdle in this project in the early process was finding my voice and validating the story I wanted to tell through my piece. I also faced setbacks in sewing the connections when the sewing machines malfunctioned, so I hand sewed many of the components and finishings. I also needed to apply tape to some connections so that wires didn’t cross on the garment. Although the “off” state aesthetic of the garment does not yet fully reflect the ornateness I hoped to achieve, the “on” state functions as planned.

With Time

I initially designed my project to incorporate multiple sensors for a more averaged sense of darkness in the environment, but I paired it down to one sensor to troubleshoot some of the connectivity issues I faced with the wiring. With more time, I would implement this original plan as well as add more lights. I think it would also be a fun addition to include motion sensors as well to give the lights a more dynamic effect if the wearer dances. I would redesign the pattern of embroidery with conductive thread as connections between the components or use another material as well.

Final Materials

  • Circuit Playground Express
  • LED sequins in white
  • Portable battery
  • Conductive thread
  • Tape


Final Project Post: Safe Sleeve

  1. Safe Sleeve
  2. Jacob Cordover
  3. Safe Sleeve is a soft, functional sleeve that conveys biomechanics that have been historically confined to clinical settings and cost prohibitive motion capture equipment.


  1. Video:


  1. Poster:

  1. Safe Sleeveis a soft knee sleeveintegrated with two inertial measurement units. Safe Sleevecalculates the angle of the knee joint— a task traditionally completed with a goniometer— by utilizing the two inertial measurement units which calculate each sensor’s angle relative to the gravity vector. These two values are subtracted from each other and streamed wirelessly to a computer via Bluetooth. The user can interact with the custom-built application in order to set bounds for flexion or extension. If the bounds are breached, the application will flash red, otherwise it will remain green. Additionally, the user can examine flexion and extension from entire streaming session with a line graph.


  1. Overall, I am very pleased with the outcome of this project. From the beginning, I wanted to work on a project catered towards sports and/or healthcare as this is what I am most interested in. With zero background in any design related fields, I tried to tailor my project towards what I was more comfortable with. I could have tried to construct the knee sleeve myself, however I don’t think I would have been as pleased with the final result as I am. Because I worked on this project solo, I invested time into getting the best data from the sensors as possible, along with creating a more seamless user experience, rather than focus on trying to achieve something I know I am not as strong in, which could have led to more frustrations and less to show for my efforts. Thus, I am left feeling pleased and optimistic about what I was able to achieve with my project, from ideation, to each milestone, to the final product, to the future of the sleeve.


  1. The original intent of this project was to create a soft, functional knee sleeve that would convey flexion and extension data in situations where traditional means of collecting this data were too costly and/or impractical. When I started the ideation process, I had a few ideas of how to accomplish this goal: one, I could integrate either conductive fabric, stretch sensors, or flex sensors onto the sleeve and wire them to a Bluetooth microcontroller, or I could go the route I ended up using, implementing IMU’s with Bluetooth to achieve my goal. Ultimately, I decided that using IMU’s would be more conducive to achieving the overall goal of this project— to create a sleeve as functional as possible. Each additional piece of hardware introduced into the sleeve created another possible failure point and took away from the overall functionality of the sleeve. However, I still was looking for a solution to contain two batteries, two IMUs, a Bluetooth module, and a microcontroller in my sleeve in a way that would achieve the intent of my project. Thus, when I came across the Yost sensors that, it just about solved every issue in creating as functional of a sleeve as possible in an extraordinarily elegant way.

The sleeve has no wires, it did not need to be soldered, its footprint is significantly smaller than having to source each part individually, and the sensors are able to be anchored to the sleeve with virtually zero extra bulk on the outside of the sleeve.

While I did pay a premium for the sensors, I am very confident that this was the best solution in attaining my goal of creating a functional sleeve that conveys flexion and extension data. At each step of the process, every decision was made with this goal in mind, and as a result, I believe I have surpassed my goal of creating this functional sleeve that conveys flexion and extension in ways that turned out even better than I had envisioned.

As for the actual data, I have gotten the sleeve to the point where it looks to be outputting acceptable data. From eyeballing angles, it looks to return an angle around 3-5 degrees from which one would expect, however, I would like to see the sleeve compared and potentially calibrated against a goniometer.

  1. There were two main challenges that I faced in creating the final product, the first of which was what methodology I should employ to get my intended data. A large issue in calculating flexion angles with both goniometers and wirelessly is that the human body is one, soft, and two, not flat. Thus, when using a goniometer, there are specific bodily landmarks to determine placement for an accurate measurement. Likewise, when using IMU’s, the sensors will never be flat, and additionally, it is not practical to ensure precise placement every time the sleeve is worn. As a result, I had three possible implementation plans: quaternions, Euler angles, and taking angles with respect to gravity.

Quaternions are an extension of the complex number system, and while they are the most complex approach to solving the problem, they offer an extremely robust solution, while avoiding known problems of Euler angles, like gimbal lock. Essentially, quaternions would create rotational offsets that could be accounted for when calculating the final angle of interest, no matter the orientation. Theoretically, this works well, however after I implemented this approach, the data would just not cooperate. I could get somewhat accurate results for around twenty seconds or so, however the angle would start to drift until the angle became completely nonsensical.

Taking angles with respect to gravity and subtracting them was the simplest approach, however it seemed to give the best angle. While this solution may not be as robust as quaternions, it was not plagued by the issues the quaternion approach presented. This method was so satisfactory, that I decided that any improvement Euler angles could potentially provide was not worth it, rather I spent the rest of my time working with the second major problem, Bluetooth connectivity.

Getting the sensors to talk to my computer hard wired was not much of a problem at all, however unplugging the sensors and communicating via Bluetooth proved to be the biggest challenge of this project. For some reason, the sensors would work fine for a few seconds and then there would be an unresolvable communication error resulting in a crash. I tried both windows machines and macs to no avail. I tried all sorts of error handling in the backend to no avail. I also made sure low battery wasn’t affecting the Bluetooth communications. Nonetheless, I noticed a few things, the first of which is that the sleeve works better when I’m around fewer devices. At the showcase, Bluetooth didn’t work for longer than a second or two. During class time, the sensors sometimes work for 10-15 seconds before crashing, however at home, the sensors will work for minutes at a time, which makes me think that the sensors are susceptible to some kind of interference.

The other thing I noticed is that the longer the sensor has been on and connected and reconnected to Bluetooth, it works longer before crashing. I am still not sure as to why this is the case.

Unfortunately, I didn’t solve the Bluetooth issue. As mentioned, error handling in the backend cast the sensors into an infinite loop of reading back nonsensical values. Thus, to work around the issue of communication error, there is a button in the user application that terminates and reconnects the streaming session. The process only takes a second or two, so until the Bluetooth issue is solved, this will have to suffice.

  1. Given more time, besides working more on the Bluetooth issue, I would harness more functionality from the IMUs. There are many different measurements that can be taken from these sensors with the accelerometer, gyroscope, and compass. While perhaps the scope of this project focused on the rehab aspect on trying to emulate a goniometer, given more time I would like to implement more performance-based features. For example, measuring a vertical leap, or measuring force produced by the leg. Performance asymmetries between the legs is a flag for increased injury risk, so this could also help further Safe Sleeveas an injury prevention tool.

Otherwise, the technology in safe sleeve can easily be ported into an arm sleeve. I’d have to do some more research into what mechanics are used in upper extremity recovery protocols as well as what performance metrics are used, but I believe the difficult part has been done.

  1. Materials:

2 Yost Labs mini Bluetooth IMUs

2 back plates with 4 anchoring screws

1 knee sleeve

Final Project Post: GLOAT

GLOAT

Team: Obasi, Jack

Project Description: Transparent bubble coat with colorful lights embedded in the lining that reacts to sound

Video:

The video is a live demonstration of Obasi wearing it to perform during the fashion show. The vest lights up according to the music in the background.

Final Poster:

Describe what your project does and how it works

Gloat is a light up vest that is made out of transparent material and neopixel light strips. When there is no music in the background, the vest glows in a rainbow pattern. When there is loud music in the background, the vest glows accordingly to the music.

Describe your overall feelings on your project

We are very happy that we got the vest to work and are surprised to find out that it looks even better than we imagined. The only frustrating part for me is soldering the light strips with wires. Due to the movement of the vest, the connection sometimes gets very unstable, but we were eventually able to fix it by using hot glue to secure the solder.

Describe how well did your project meet your original project description and goals

This project meets the exact original project description since it lights according to music. We designed the vest intended for live concerts setting, and it worked perfectly during Obasi’s live performance. We did not have the original goal of it having a rainbow animation when there is no music, but it is an extra feature that we added later

Describe the largest hurdles you encountered.  How did you overcome these challenges

The largest difficult was soldering the wires. The vest consists of two major wires throughout the entire body. Interestingly, one of the wires never gets loose while the other one constantly gets unstable. We have to solder the wires over and over to make sure the connection is stable. Eventually, we stablize it with hot glue and connection becomes stable.

Describe what would you do next if you had more time

If we have more time next time, we might put on more wires and program more light variations so that it could have a customized light for each loudness, which could lead to more diversity in colors. We also might have it react to other inputs such as jumping motion.

Final Material used

Clear Marine Vinyl

Polyfill

Black ribbing

Black zipper

Silver Reflective Tape

NeoPixel Light Strip

Circuit Playground Express

External Battery

Wires


Final Project Post- Circular Pleating

Circular Pleating, Michael Sachen

  1. Exploration of new form and volume through curved (as opposed to linear) folding in garment construction


  1. Upload a video of your project (4 points). The video should include:
    1. The name of your project
    2. A brief description and demonstration of your project

I don’t have a “Dynamic project” PLEASE LET ME KNOW if you need a video, it doesn’t make sense to make one.

Brief Description– Approach volume and form in clothes making by “starting with a circular medium.” This changes most everything in the way we make clothes– how they are sewn, how volume is added and subtracted etc. ALL finishing on these garments was done by hand to minimize bulk and need for facings.

  1. Upload an image of your final poster as a JPG (1 point) 

  1. Describe what your project does and how it works (2 points) (Min. one Paragraph)  My garments are based on subverting the axiom within clothes making that we work in (relatively) rectangular forms. The volume “works” when we fold paper because of the interplay between bending and folding that happens simultaneously. What happens mathematically is ratio of the inter and outer radii decreases and the disk buckles to a stable position as a result. This does not happen with linear folding. An aside, is that all of smocking practices are done in linear grids, I believe this to be the most practical short term application of these principles.  There is extensive academic papers on this topic– I was concerned during final critique that instructors were unsure of viability in heavy weight materials, but there is literature on this that is linked
  2. https://erikdemaine.org/papers/CurvedCrease_Symmetry/


  1. Describe your overall feelings on your project. Are you pleased, disappointed, etc.? (2 points)(Min. one Paragraph) I have mixed feelings. For me this project was an experiment in delving further into the relationship between fabric, clothing and the world. Specifically thinking about contradicting what the fabric ‘wants’ to do. So the best part for me, is reinforcing and further understanding the dependance of cut to the fabric that you are working with– after this project, I think more about cutting within the constraints of the cloth and building the pieces of the garment into the fabric etc. I am obviously not happy that I ended up with a ‘skirt with holes in it’, to me there is a lot of hidden beauty, like finishing things completely flat and in circles that took much more time than traditional clothing as it has to be forced together so to say– and I think a lot of other things I learned about clothes making (try sewing a circle with a machine that sews straight lines etc.) But as it is not exactly what I set out to do I am upset, though I think I learned– What is interesting to me… the ideal scientist starts an experiment under the assumption that they are wrong, I used to believe that cutting with consideration to the human body foremost would lead to useful and new design– to me this was an experiment in not considering the fabric first (against the advice of the world’s best clothes makers) and I see that it opens up perhaps a non useful new set of design possibilities.
  1. Describe how well did your project meet your original project description and goals.  (2 points)(Min. one Paragraph) I believe my project well replicated the method I intended but not the result, the skirt pleated 100% as intended but the weight (an untested variable) was too much. That being said, while the intended goal for this class was to create the volume, it opened up new lines of thinking in fabric manipulation.
  1. Describe the largest hurdles you encountered.  How did you overcome these challenges?  (2 points)(Min. one Paragraph) It took a prohibitively long time to test my ideas– I think this is mostly due to the nature of the project. I think that I could have sacrificed quality of crafstmanship for speed, but my fear was to end up with a poorly made project. When the biggest hurdle (i.e. the skirt not taking up volume) was encountered, I started to think about the possibilites of these ideas in other applications such as fabric manipulation.


  1. Describe what would you do next if you had more time (2 points) (Min. one Paragraph) I think that it would be possible to create this form in fabric with more thorough materials testing. At the beginning of the semester, I was looking at non-woven silks and other non rectilinear fabrics– But the processing seemed prohibitive within the time scale– i.e. The silk needed was quite expensive and was a new type of material production that I would have to learn in itself. I think to thoroughly realize this project would involve producing the fabric which is a new set of challenges in itself


  1. 4 yards Worsted Wool and  3 yards Polyester Crepe

Final Project Post: Virtual Vermin

Virtual Vermin

Jeff Brandt


One Sentence: The Virtual Vermin is a glove that functions as a computer mouse designed to relieve muscle exhaustion and reduce the possibility of carpal tunnel.


Video:

Image of Final Poster:

What does the project do?

The Virtual Vermin places the buttons of a computer mouse into the user’s fingertips. It works by using a circuit board that has connections to soft buttons which are placed inside the fingertips of the glove. To use the Vermin, the user simply has to place their hand inside the glove and push down with the finger corresponding to the desired button. In this iteration, the pointer finger acts as the left click, the middle finger acts as the click of the scroll wheel, and the pinky finger acts as the right click.

Overall feelings on the project

All in all, I am extremely happy with the way that my project turned out! I wish I could have spent more time making it look “prettier”, but I am still pleased with the fact that it actually works. I also wish I could have experimented with more materials to insulate the wiring as the comfort level could be improved. In the end though, I am proud of my work and think that it may have not exceeded the goals I had set but definitely met those expectations.

How well did it meet the original goals?

While I would still deem the Vermin a success, I think it didn’t quite meet the original goals I had at the beginning of the semester. Part of this is because I had painted a picture in my head of a glove with a logo and other bells and whistles to increase the aesthetic appeal. I really didn’t know just how much I didn’t know about computer mice and that caused me to delay the process of making it look good and focus more on the functionality. The other reason I think it may not have met the original goals is more of a technicality but this current iteration does not allow the user the ability to scroll down a web page like they would with a traditional mouse. However, I think this potential downfall was worked around because the user still has the ability to click the scroll wheel and this is actually more important than scrolling when using SolidWorks (which was the original design intent for the mouse).

Largest hurdles that I needed to overcome

The largest hurdle that I needed to overcome was my lack of knowledge in regards to how a computer mouse worked. I didn’t know just how complicated the circuitry and LED light reader of an optical mouse were. I had original plans of just using an accelerometer however, I quickly found out that the location sensitivity was much more important that I previously thought. Another hurdle that I needed to overcome was my subpar soldering skills. While I did improve them during this semester, I needed much better soldering to prevent all of the conductive thread connections from breaking apart.

Future plans if I had more time

If I had more time, the first thing that I would do would be to sew my own glove. With the insulation that was required to protect the conductive thread and the cover for the circuit board, the glove felt a lot tighter than it did when I originally wore it. I think this would help the hard base plate of the mouse to feel less bulky as well as provide more comfort for the wearer in the palm region where the cover extrudes. Additionally, I would try to find another solution for the circuit board cover because it was much thicker than I originally intended. The first two 3D prints failed because the curvature of the cover was too complex to make with my desired thickness.


Materials List:

Wireless Mouse // Quantity: 2 // $9.99 // https://www.amazon.com/gp/product/B015X2OD52/ref=ppx_yo_dt_b_asin_title_o00_s00?ie=UTF8&psc=1

Conductive Fabric // Quantity: 1 sq. ft. // ? // Supplies in classroom

Conductive Thread // Quantity: 1 yard // ? // Supplies in classroom

Gloves // Quantity: 1 // $11.95 // https://www.amazon.com/Agloves-screen-gloves-texting-gloves/dp/B004A9FI2M/ref=sr_1_6?keywords=thin+glove&qid=1552266834&s=electronics&sr=1-6

3D printed cover for circuit board // Quantity: 1 // $2.14 // created in Solidworks


Final Project Post – InGlove

Project Title: InGlove

Project Team:  Vedant Agrawal and Shruti Nambiar

Project One Liner: Smart glove that helps the user control their TV and smart switches/lights using hand gestures

Video: 

Poster:

Describe what your project does and how it works

This is a smart glove that helps the user control smart (WiFi connected) or Infrared (TVs, Music Receiver) devices in their home. The glove has fabric flex sensors integrated onto the fingers and which allow the Particle Photon microcontroller to recognize when the user has flexed their fingers by making specific hand gestures.  For IR devices, the microcontroller sends out the IR signal using an IR LED transmitter circuit integrated onto the glove. For smart devices, the microcontroller publishes an event on the Spark cloud via WiFi. Then, IFTTT, a web-based app gateway service, recognizes the published event, and tells the smart device app to execute the command respective to the gesture made.

The glove is meant to target users with physical disabilities that find it difficult to move around their house to control electronic devices in their homes, as well as for users with speaking disabilities that cannot necessarily communicate with their Google Home/Alexa to control their smart devices.

Describe your overall feelings on your project. Are you pleased, disappointed, etc.?

We started out with the goal of building a gesture based alternative to a Google Assistant.  We are happy that we did indeed build a prototype that accepted gesture based inputs to control smart home devices. However, there was indeed  quite some room for improvement. We spent a large part of our time on coding and technical aspect and less on the assembly and design integration of the circuits into our glove.

Describe how well did your project meet your original project description and goals.

Our original goal was to build a gesture based home automation glove. I believe we did a good job in establishing our initial goals but more as a proof of concept than as a finished product. We showed that it was very well possible to connect wearable fabrics over WiFi to smart devices and control several devices at a time using gestures. However, there was room for improvement in terms of consistency of results. We had a tough time with our IR circuit and it was only working intermittently. We could also have done a better of job of the integration of these components into the fabric.

Describe the largest hurdles you encountered.  How did you overcome these challenges?

One of the earliest challenge we were faced with were the flex sensors itself. We first bought a commercial long and short flex sensor from Adafruit.  However the commercial flex sensors costed 12$ a piece and were made of a non-flexible plastic like material. It was difficult to tack it down with the fabric and have it follow the movement of the fabric. We then figured out how to build our own DIY flex sensors with Velostat and electrical tape. This costed us less than a few cents a piece. However, the electric tape did not adhere well to the material of our fabric either. After discussing with Marianne,  we figured we could try building flex sensors with fabric!!! And it worked.

Once we did this our next challenge was to have the flex sensor communicate with the smart device. We used a Particle Photon as a microcontroller. There was a small learning curve to understanding how the Particle worked. Once we figured that out, we integrated it to the smart sensor using a gateway application called IFTTT. However, since IFTTT is a free platform, guarantee of service was about once a minute since they had to cater to a larger market. This meant that when the Particle Photon would publish an event onto the Spark cloud when a finger was flexed, the IFTTT app would only check for this event once per minute, causing there to be a large delay between the finger flex and the smart light turning on. We tried to work around this by building our own app that could read from Spark cloud of the particle servers. But the android API integration wasn’t very well documented and the support from online communities were low. So we decided to stay with IFTTT as a service.

Another challenge we faced generally throughout the project was hardware debugging. Since neither of our backgrounds involved a strong base in embedded systems and electronics, we had a slightly tough time with it. Trying to integrate and assemble all of the components onto the glove was also quite challenging since we had to ensure that there are no cross connections and short circuits and that all the wires are tacked down to make perfect and consistent contact. However, over the course of the semester, we became better at hardware debugging and we began to understand what to look for and how to diagnose the circuit problems better.

Describe what would you do next if you had more time

Since neither of us had experience with app development, we spent a lot of time trying to figure out how to make an app that connects to the Spark cloud to read a published event from the Particle, and then also connect to the smart switch/light app that controls the smart device. We did figure out that those two functions have been done independently, but not in the same app (except for IFTTT). Thus, we would use the extra time to look into how the app would be developed for this glove, to reduce the delay between the finger flex and the smart light turning on/off.
We would also like to integrate more flex sensors to capture a wider range gestures, and thus commands. Additionally, we would use that time to better integrate the circuits we have into the glove, to make it comfortable, yet functional.

Materials Used:

  1. 1 x Thin Glove
  2. 1 x Particle Photon
  3. 3 x DIY Fabric Flex Sensors:
    i. Velostat – Force-sensitive fabric
    ii. Conductive Thread
    iii. Copper Tape
    iv. Pieces of thin cotton fabric
  4. 1 x Infrared LED
    General Electrical Components (wires, resistors, general purpose transistor)

Final Project Post: Heart Rater

Project Title

  • Heart Rater

Project Team

  • Sungjin (SJ) Park

One sentence that describes your project

  • Winter glove that reads and indicates your heart rate zone on winter activities.

Video

Final Poster Image

Describe what your project does and how it works

  • This is a winter glove that reads heart rate data from a fingertip and indicates the heart pulse with the light sensor on Arduino board during any winter activities, especially for shoveling. The mechanism of the pulse sensor is that it shoots light through fingertip and gathers blood flow pattern data. With that pattern, I made the board to blink with the heartbeat. Green light indicates that your heart pulse rate is normal and red light indicates that your heart pulse rate is in a dangerous zone which is below around 30 bpm or above 110 bpm which is an extreme condition. In the showcase, mostly elder people showed interests in my project to check their heart rates, which was great since my target audiences are elders.

Describe your overall feelings on your project. Are you pleased, disappointed, etc.?

  • It doesn’t look so fancy, but I like the result of its functionality and the design outcome. In the middle of the project, I switched the device from Arduino Uno to Circuit Playground Express, and it reduced extra bulkiness on the glove, making it look much simpler. Since I pursued minimalism from the start of the project, I think I almost achieved it design-wise.

Describe how well did your project meet your original project description and goals.

  • It was originally designed for athletes to check their heart rate on any exercise. Within a few weeks in the course, I decided to switch the material to wool glove since spandex glove would not give a good fit with my devices and wires strapped around it. As I switched glove material to wool instead of spandex, the final outcome became more pleasant with warm fit.

Describe the largest hurdles you encountered.  How did you overcome these challenges?

  • I had a few challenges. First, the wires kept falling apart after several wears. Wires were not strong enough to hold with soldering when wearing several times. Since the hand moves consistently, the seam kept moving along with the hand. I resolved this issue with double strapping the wires to the board. Also, with similar context, I tried to hide every wire for minimal look by stitching them with a thick yarn, but it got too stiff that the wires kept broken out of the board. So, I decided to go without covering them. Most parts of wires and battery part are hidden in the neck of the glove but this part I didn’t cover for such reasons.

Describe what would you do next if you had more time

  • I would implement Bluetooth device on my project to wirelessly send constant feed to the phone, so that I can record daily heart rate patterns. Within a given time frame, it was overwhelming to build a functional app that can receive live feed from the sensor through Bluetooth device. If I extend this project further, I would like to complete this function.

List the final materials used in your project

  • Adafruit Circuit Playground Express
  • Lithium Ion Polymer Battery
  • Pulse Sensor (Heart-Rate Monitor)
  • Wool glove