Project Post #6

Project Title 

Heart Rater

Project  Team

Sungjin (SJ) Park

One sentence that describes your project 

  • Winter glove that reads and indicates your heart rate zone on winter activities.

Weekly Accomplishments

  • Still working on the accuracy of the heart rate
  • Ordered small sized battery to fit on back of the glove.

Image

Material List 

Added Item

  • Part/Material: Lithium Ion Polymer Battery
  • Price: $6.95
  • Quantity: 1
  • Link to a purchase location: https://www.adafruit.com/product/2750

Kept Items

  • Part/Material: Adafruit Circuit Playground Express
  • Price: Provided in class
  • Quantity: 1


  • Pulse Sensor (Heart-Rate Monitor)
  • Price: $24.99
  • Quantity: 1
  • Link to a purchase location:  https://shop.openbci.com/products/pulse-sensor?utm_medium=cpc&utm_source=googlepla&variant=22543672899&gclid=Cj0KCQjwjpjkBRDRARIsAKv-0O12qE-56tiH7XDqo-T9Cz1l4Yf1ybwdN9RlAyg_Nkxs_yUG0b9LqbsaAkcxEALw_wcB


Areas of Concern

  • Ground wire broke. Soldering need to be done again for GND wire.

Project Post #6: Michael Leykin

Project Title: Penetration of Endpoints and Networks Infiltration System

Project Team: Me, Myself and I

One Sentence: On-premises vulnerability assessment tool.

Weekly Accomplishments + Pics:

I have designed the parts for the covers for the first two parts and these are ready for printing. I have also taped down the RFID theif into one shape.

Material List:


Part

Price Quantity Link
wireless network adapter $28.50 1 https://www.amazon.com/gp/product/B0035OCVO6/ref=ppx_od_dt_b_asin_title_s01?ie=UTF8&psc=1
Ethernet cable $3 1 https://www.amazon.com/AmazonBasics-RJ45-Cat-6-Ethernet-Patch-Cable-5-Feet-1-5-Meters/dp/B00N2VILDM/?tag=whtnb-20
Raspberry Pi 3 or 3 B+ $38.10 1 https://www.amazon.com/ELEMENT-Element14-Raspberry-Pi-Motherboard/dp/B07BDR5PDW/?tag=whtnb-20
microSD card $6.85 1 https://www.amazon.com/SanDisk-microSDHC-Standard-Packaging-SDSQUNC-032G-GN6MA/dp/B010Q57T02/?tag=whtnb-20
power source (Enokay Power Supply for Raspberry Pi 5V 2.5A Micro USB Charger Adapter with On Off Switch) $8.59 1 https://www.amazon.com/Enokay-Supply-Raspberry-Charger-Adapter/dp/B01MZX466R/?tag=whtnb-20
USB keyboard/mouse interface (Rii Mini Wireless 2.4GHz Keyboard with Mouse Touchpad Remote Control, Black (mini X1)) $16.99 1 https://www.amazon.com/gp/product/B00I5SW8MC/?tag=whtnb-20
SD card adapter $7.99 1 https://www.amazon.com/Vanja-standard-Connector-Notebooks-Smartphones/dp/B00W02VHM6/?tag=whtnb-20
Raspberry Pi Zero Wifi $10.00 1 https://www.adafruit.com/category/933?src=raspberrypi
Pi Zero USB Stem $5.00 1 https://shop.pimoroni.com/products/zero-stem-usb-otg-connector
2 x Tactile Push Button Switch With LED lights $3.00 1 https://www.aliexpress.com/item/5PCS-1-set-12X12X7-3-Tactile-Push-Button-Switch-Momentary-Tact-LED-5-Color-12X12X7-3mm/32873551440.html?spm=2114.search0104.3.2.3b0241a0ILdgzL&ws_ab_test=searchweb0_0,searchweb201602_5_10065_10130_10068_10890_10547_319_10546_317_10548_10545_10696_453_10084_454_10083_10618_10307_537_536_10902_10059_10884_10887_321_322_10103,searchweb201603_58,ppcSwitch_0&algo_expid=0747bf75-f245-43c5-a0c1-4966ea4078a8-0&algo_pvid=0747bf75-f245-43c5-a0c1-4966ea4078a8&transAbTest=ae803_5
DIP switch with 4 switches $3.00 1 https://www.aliexpress.com/item/10pcs-lot-Slide-Type-SMT-SMD-Dip-Switch-2-54mm-Pitch-2-Row-4-Pin-2/32956815576.html?spm=2114.search0104.3.3.4c971641sXqPaV&ws_ab_test=searchweb0_0,searchweb201602_5_10065_10130_10068_10890_10547_319_10546_317_10548_10545_10696_453_10084_454_10083_10618_10307_537_536_10902_10059_10884_10887_321_322_10103,searchweb201603_58,ppcSwitch_0&algo_expid=60dfe6ec-dd9e-4db7-93f0-5f94aec30ef4-0&algo_pvid=60dfe6ec-dd9e-4db7-93f0-5f94aec30ef4&transAbTest=ae803_5
2 x 330R resistors HAVE 1
MFRC522 RFID reader module $5.49 1 https://www.amazon.com/gp/product/B01CSTW0IA/ref=ppx_od_dt_b_asin_title_s01?ie=UTF8&psc=1
MIFARE 1K RFID card (with changeable UID, 13.56Mhz) Included 1
some RFID card to copy (only 13.56Mhz cards can be read/written by this particular card reader module) Included 1
Tactile Touch Push Button Switch Tact Switches 6 X 6 X 5mm Included 1
LEDs (red, yellow, green) + resistors (1k ohm) $7.00 1 https://www.amazon.com/gp/product/B01ER728F6/ref=ppx_od_dt_b_asin_title_s02?ie=UTF8&psc=1
3 AA batteries (1.5V each) HAVE 1
2 zener diodes (3.7V) or (3.6V) $8.00 1 https://www.amazon.com/gp/product/B07BTKVRG8/ref=ppx_od_dt_b_asin_title_s01?ie=UTF8&psc=1
switch (3 Terminals ON/ON 2 Positions SPDT Electronic Push Button Sliding Switches) $5.00 1 https://www.amazon.com/gp/product/B0799R529Z/ref=ppx_od_dt_b_asin_title_s02?ie=UTF8&psc=1
cables, hot glue, tape (30AWG Insulated Silver Plated Single Core Copper PCB 0.25mm Kynar Wrapping Wire) $5.00 1 https://www.amazon.com/gp/product/B07M7BHKRV/ref=ppx_od_dt_b_asin_title_s01?ie=UTF8&psc=1
Arduino Pro Micro 5V $20.89 1 https://www.amazon.com/gp/product/B01MTU9GOB/ref=ppx_yo_dt_b_asin_title_o04_s00?ie=UTF8&psc=1
PCB Prototyping Board $10.00 1 https://www.amazon.com/gp/product/B072Z7Y19F/ref=ppx_od_dt_b_asin_title_s02?ie=UTF8&psc=1
Solder Gun $67.98 1 https://www.amazon.com/gp/product/B01MDTO6X7/ref=ppx_yo_dt_b_asin_title_o06_s00?ie=UTF8&psc=1
Desoldering Gun and Desoldering Wick $7.69 1 https://www.amazon.com/gp/product/B07BB8DGMP/ref=ppx_yo_dt_b_asin_title_o07_s00?ie=UTF8&psc=1
Battery Pack For Raspberry Pi 3 B+ $25.25 1 https://www.amazon.com/gp/product/B07BSG7V3J/ref=ppx_yo_dt_b_asin_title_o02_s00?ie=UTF8&psc=1

Areas of Concern: Still need to figure out a way to boost my wifi pumpkin to be more powerful and need to find a way to effectively demonstrate my tools, may be difficult without getting into technicalities. I am also concered about my covers fitting onto my parts. Everything is coming together but I am still having some last roadblocks.

Project Post #6

PROJECT POST #6

Project Title: Vis Hat  

Project Team: Lydia, Fu, Jay

1 Sentence: This Vis Hat collects and visualizes your brain data as you respond to your environment using Near Infrared Spectroscopy technology.

Weekly Accomplishments:

Lydia:

  • 3D modeled and printed the first prototype for housing photodiode emitter and detectors
  • Planned out remaining prototype design construction
  • Built first rendition of prototype for Vis Hat
  • Looking into current visualization code

Fu:

  • Circuit assembly on breadboard, optimize and design final circuit on protoboard..
  • NPN transistor build in circuit.
  • Tuning the resistor for higher sensitivity.
  • Looking code for duty cycles.

Jay:

  • Proof of concept testing, breath test using diodes on head
  • Circuit assembly
  • Resistor adjustments for sensitivity of photodiode
  • NPN transistor added for control of emitters
  • Code to address NPN Transistors
  • Started code for duty cycles of scanner

Images:

Image 1 is of the 3d model in rendered form

Image 2 is a photo of updated prototype model notes

Image 3 is of the completed circuit on breadboard


Material List:

title/link # needed price/unit notes shipping and tax TOTAL PRICE:
arduino due 1 34.43 34.43
NPN transistor 1 5.99 this one unit contains ~200 resistors 5.99
730nm emitter 2 8.61 9.54 26.76
850nm emitter 2 1.46 2.92
850 max nir detector/sensor 2 5.37 9.02 19.76
bluetooth 1 28.95 RN41XVC (with chip antenna) 8.81 37.76
850nm emitter 2 1.46 To account for trial and error hardware testing 7.99 9.45
9 volt batter power supply adapter 1 5.99 5.99

Project Concerns:

At this point we are in the home stretch of the course with a good amount to do. We have it all planned out, which works with the schedule but at this point have two potential concerns. One is that things take longer than planned. We hope to finish the build and testing this coming week, which could mean we find out our data gathering isn’t where it needs to be. The following week we’ve left for data visualization, which encompasses the data analysis and cleanup portion of the project, the demo setup (figuring out a good way of displaying everything for the demo and presentation) and coding the actual visuals. This shouldn’t be too big of a task, we just need to make sure we’re on top of it and thinking ahead. We’re planning to meet more outside of class time and planning for things in the meantime beforehand.


Project Post #6: ROETE

Radio Outdoor Emergency Transmitter Electronic

Natalie Tack

One sentence that describes my project: A device that transmits location via radio when activated in an emergency.

Weekly Accomplishments:

I figured out how to parse the GPS coordinates, I hit a snag with the remove method in Arduino, if you use remove(0) I thought it would remove the first character at index 0 in a string. I was wrong, it removes everything in a string from the zero index onward. So I fixed that problem.

I also programmed the device to wait for 3 button clicks, then buzz twice, then wait 30 seconds (less than a minute for demo purposes), then if no user input, the broadcast starts after the 30 seconds.

I also got the patch this week and found a jacket with an inside pocket that might work better for putting the radio transmitter in.

Earlier in the week I had problems with the radio connections again, as the radio wasn’t being registered as connected to the Circuit Playground Express. Hopefully this next week I can solder the connections and they’ll work all the time.

Image (not new, but showing the connections I’m having problems with):

Image (patches):

Material List:

  1. FM Stereo Radio Transmitter
    1. Price: $20
    2. Quantity: 1
    3. Link: https://www.amazon.com/Adafruit-Stereo-Transmitter-RBDS-Breakout/dp/B00SK8ME4Y#
  2. GPS Module
    1. Price: $40
    2. Quantity: 1
    3. Link: https://www.adafruit.com/product/746
  3. Vibration Module
    1. Price: $6.95
    2. Quantity: 1
    3. Link: https://www.sparkfun.com/products/11008?_ga=2.218497438.624035456.1554576553-2048369341.1554576553
  4. Patch
    1. Price: $20
    2. Quantity: 1
    3. Link: http://eliteembroideryandscreenprinting.com/
  5. Transistor
    1. Price: $0.30
    2. Quantity: 1
    3. https://www.digikey.com/product-detail/en/on-semiconductor/PN2222ABU/PN2222AFS-ND/6534&?gclid=EAIaIQobChMIn9Kmo5G84QIV1LjACh2IEQZDEAQYAyABEgJoIfD_BwE

Areas of Concern:

This week I’m going to integrate all of the technology with the visual aspect. Sewing the button together and  putting all the electronics into some sort of container so that everything fits together.

I think that I’ll need some help this week just figuring out how to organize everything together so that it is easy to disconnect from the jacket to take out.

Also, the patch is non-traditional, so there is no satin edging. I might need help with how to make the edges of the patch look neater (in the image 2 of the patches are cut close to the edge, the other patch is still connected to a larger piece of fabric).

Project Post #5: Scavenger Stuffs

Weekly Accomplishments:

Second stuffed animal has been started and details have been added.

The game now has a working “travel” feature, allowing users to venture out with their animas for a set period of time. The user is updated every [x] seconds, showing what their Anima is up to

The server (GameSparks) has been fully set up to hold the information for the game. Right now, everything is being tested on the provided test harness, but I’ve been able to confirm some of the features such as the “Add Anima” script are working as intended on the gameside.

The RFID tags can now be read. The wiring is a bit iffy, so its not consistent yet. I’ve switched over to setting up on the RaspberryPI 0W for testing as a result. After many attempts with the bluetooth/wifi connections, I believe the best way of handling passing information will be making a dummy controller of Unity to load onto the pi and run to update the database.

Images:


Additional Material List:

    1. Battery/USB Charger (still torn on which I’ll be using, but right now it isn’t a priority)
    2. MicroSD Card (this might add a bit to the expense of the plush
    3. Cost of Plastic for 3D printing the pendants (depends on whether I’m crushing the old pendant ot make the new one, or working around the original key fob. Again, I’ll make this call once I have a base product working).

Areas of Concern:

Biggest issues this week:

  • The RFID Read/Writer works, but the wiring causes it to be a bit iffy as to whether its going to work or not. Shouldn’t be an issue once soldered, but I’m hesitant to solder without having a working temp on the 0W
  • Passing information is a bit odd since I don’t have a proper SDK for the pi. The best way of adding Animas will be writing to a file the RFID data as is implemented now, and then having a dummy Unity file waiting for that change and using the Unity SDK to pass the info up. The dummy Unity file works, and the RFID part works, so now it’s just a matter of making sure a Linux Unity build is viable and works as intended
  • (Also WIFI will be needed for the Animas due to this change. Not a bit deal, but since there is no graphical interface, I’ll either have to scan and jump on the nearest network or SHH into the pi whenever setting one up)

Project Post #5: Wearable Circuits

Wearable Circuits

This week, I’ve been looking into rectennas and trying to see if I can power small LEDs from RF from common sources like Wifi routers or leakage from microwaves.

I think doing an incredibly intricate design with impedance matching, ect. might be too much work for the time I have. I’m thinking it will be easier and more practical to experimentally determine what kind of energy I can collect with a small rectifying circuit.

I’ve been inspired by these two examples:

https://ieeexplore-ieee-org.ezproxy.library.wisc.edu/document/8072590

https://ieeexplore-ieee-org.ezproxy.library.wisc.edu/stamp/stamp.jsp?tp=&arnumber=8072590

And this guy (although he’s using a massive antenna): https://www.youtube.com/watch?v=XpLCK88nVgU

I also have ordered new NFC tags, that are much lower frequencies and can be read by your phone.

Materials List:

  1. Clear Covering Self-Adhesive 
    1. https://www.amazon.com/Magic-Cover-Adhesive-Contact-Projects/dp/B000BPF9QY/ref=sr_1_26?crid=QOW16D2H82TC&keywords=vinyl+adhesive+paper&qid=1551742619&s=gateway&sprefix=vinyl+ad%2Caps%2C195&sr=8-26
    2. Count: 1
    3. Cost: $5.50
  2. Silhouette Temporary Tattoo Paper
    1. https://www.amazon.com/Silhouette-MEDIA-TATTOO-Temporary-Tattoo-Paper/dp/B0043WJ3OA
    2. Count: 1
    3. Cost:  $8.99
  3. Spray Adhesive
    1. https://www.amazon.com/3M-General-Purpose-45-Adhesive/dp/B000PCWRMC
    2. Count: 1
    3. Cost: $5.77
  4. Speedball Gold Leaf
    1. https://www.amazon.com/Bememo-Imitation-Gilding-Crafting-Decoration/dp/B0722X91YR
    2. Count: 1
    3. Cost: $6.99
  5. SPMWH22286D5WAP0S2 (Samsung LEDs)
    1. Count: 100
  6. RC1210JR-07100RL (100 Ohm Resistor)
    1. Count: 100
  7. SL3S1203FTB0,115 (UHF RFID)
    1. Count: 10
  8. C1812C102KGRACAUTO (Capacitor)
    1. Count: 10
  9. NTR5105PT1G (Diode)
    1. Count: 10
  10.  Conductive Guitar Tape
  11.  NSR201MXT5G (RF Schottky Diode)
  12.  ST25DV16K-IER6T3 (NFC IC)
  13. RF700072 (NFC Antenna)
  14. RF700070 (NFC Antenna)


Project Post 5 for Circular Pleating


Circular Pleating

  • weekly accomplishments list what you accomplished for each team member

This Week I finished the dress pattern and uploaded it to an illustrator vector,  I laser printed test pieces on the laser cutter and realized that I will have to map the pattern with dots in order for the pieces to have more integrity. Now that I have the process figured out, the dress making should become a lot easier.

I have also started writing a paper/ presentation that I will be giving at UGS this upcoming friday. Seeing as my project is kind of toeing the line of what we consider to be technology, I would like to chat along those lines.

This upcoming week I hope to laser cut, and start assembling a full sized garment. I’m also wondering how many I should hope to hit to be successful in this course.


changes to your approach after presenting your work what changes have you made in your approach

I am making sure to draft the patterns that will be cut in the laser cutter with dots. I think this will make construction a lot easier

  • material list For each material fill out the following information (a table may be a good way to do this)
    • Part/Material
      • Polyester
    • Price
      • 2.37 per yard
    • Quantity
      • 12 yards
    • Link to a purchase location
      • https://www.fabricwholesaledirect.com/products/chiffon-fabric


InGlove – Post 5

InGlove

Curt, Shruthi, Vedant

Weekly Accomplishments

Curt –

I am going to present this in a different tone relative to previous posts that I have written. Specifically, I am going to allow more digression / stream of conscious comments in order to capture some of the context of last week (hopefully for entertainment value). If you don’t care for the longer version I have included a summary.

(Summary)

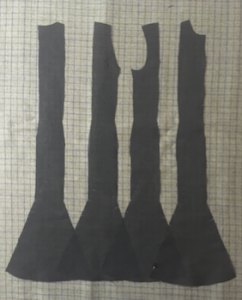
  • 3D printed all prototype finger parts
  • Constructed first version of the finger. Noting all construction issues.
  • Developing electronics of the finger (and struggling with a servo jitter issue along with sporadic movements)
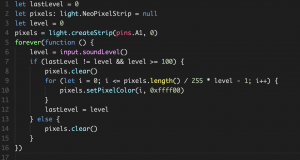
  • Figured out the erratic servo issues are due to the ESP32 being a 3.3V microcontroller that has an issue controlling 5V servos once the Vcc voltage drops (motors starting moving). Current solution to this is to use a different 5V microcontroller until I get a 5V level shifter. Also servos will be driven off a separate USB powersupply.
  • Programmed a servo driver interface to determine appropriate starting joint values and joint limits. This will hopefully be shown in the demo.
  • I wear the finger to understand how it feels (weird) and
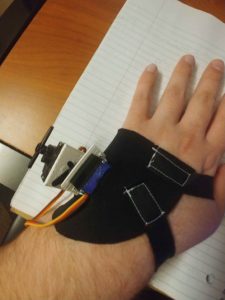
  • Ordered a glove that I like (also some through-hole PCBs for soldering later in the project).
  • Goal for next week is to crank out the flex sensors and integrate everything together.

(Long Version)

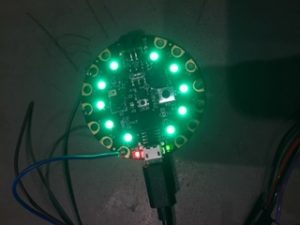
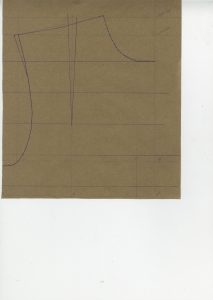
My work this week focused on finishing the prototype robotic finger and its mounting in order to start wearing the device thereby gathering insight into improvements for future versions. Below are several pictures from early in the week as I started exploring the integration process. During this time I was also printing parts at both the 3D printer on the second floor and the 3D printer at College Library InfoLab.

After picking up the 3D parts on Friday (in the much needed break I had during the day of the UIST deadline) I was able to get started on constructing the full finger.  More specifically, I started construction of the finger after a quick break to decompress from submitting the paper I was coauthoring (where I had a night’s deficit of sleep and fresh dose of caffeine mixing with the adrenaline already keeping me awake). I don’t have a picture of this version as it never took complete form. Instead I found I had to modify the components in order to get the individual pieces to work together. Unfortunately this meant going through all of the extra hinges I printed (in anticipation of this). Furthermore, I ended up cracking and warping most pieces (pretty sure this was not the sleep deprivation just poor part design).  In the end, I did manage to create a finger that came together as a complete piece (along with plenty of notes on what to change for future versions). Below is a picture of the finger in all its glory (note it is actually a later picture once it started working).

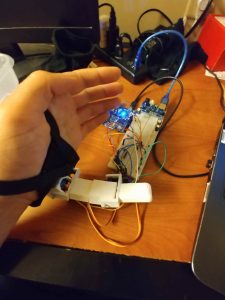
On Saturday I resolved to complete the finger for the demo on Monday. In comparison to my induced manic state on Friday (solely as a response to the unhealthy cocktail of stress, sleep deprivation, and caffeine), I was less productive. On Saturday, I was able to wire up the finger and started programmatic control of the servos. During this time I found an issue with using the ESP32 as my microcontroller, in that the ESP32 is a 3.3V device whereas the servos are ~5.5V. Ideally this is not a problem since the 3.3V should be barely high enough to be detected as high but once the servo starts to move (thereby drawing current) the voltage rail sags causing the microcontroller (connected to the same USB hub as servo motor voltage regulator) IO voltage to sag as well. This manifests as unpleasant jittering with the occasional sporadic spasm (which made me question whether the thing I was created was even safe to wear nevertheless I continued on). I ended up banishing the finger to a plastic box so that it would not make a freedom-focused break for the edge of the desk while I was debugging.  Saturday ends with me using an old arduino-clone microcontroller that is 5V to get rid of some of the odd behavior. I am planning on getting a 3.3V to 5V level shifter IC which should work even when the voltage rail sags.

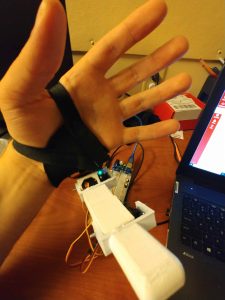
Sunday, I finish some debugging on the servo control using the arduino clone and then use the serial interface I wrote to capture the joint information that I think is acceptable for the finger. After this I placed the finger onto my hand to get a feel for the device. As a short description, “it feels very weird when the servo moves”. Though this was nothing like an earlier moment where I only had the base on and reached into a cabinet getting caught on an edge that frankly I did not notice before. This event caused a moment of panic as my body had not adopted the base as part of its mapping. Lastly on Sunday, I ordered the glove that I intend to use for the final version. Final figure is an action shot with the finger.

My goals for this next week is to develop all of the flex sensors. I purchased the electrical tape I need (and so long as the Velostat, conductive thread, and conductive fabric last), I should be able to complete all eight sensors. Then it is onto implementation of the algorithm. I did put some further thought into this and I will be using PCA in order to make sense of all the data entering from flex sensors in addition to the orientation and acceleration vectors captured for the hand. From the PCA output I will construct a supervised learning ML task, starting with a linear regression (we can all dream that the solution is simple), but moving to something more complex like nonlinear regression, random forest regression, etc. Specifically to make it a supervised learning task I will create a program that requests a set of gesture and then I will enter the servo joint values associated with that state.

Shruthi –

For this week I worked on building an android application. I spent sometime simply understanding the basics of android app development process. After that I tried reading through the particle documentation of its API and was trying it out. My goal was to have an app read the data off a particle photon. However, the particle documentation is a bit vague and assumed a lot of knowledge of android development and I found it hard to build something from that documentation alone. I then started looking around for examples and eventually found one. In the process I realized that in order to establish connection with the particle server I need to use sockets to establish an open ssl connection using REST interface. To set this up I installed all the binaries required to setup curl on windows, however it is currently giving me an error when I try to POST a request. I plan on spending time maybe until Wednesday on this before trying alternate approaches.

Vedant – 

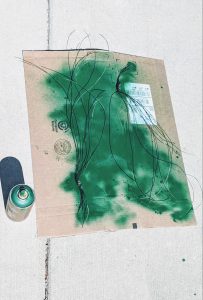
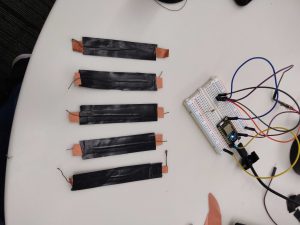
This week we looked more into developing an app that can relay information from the Particle Photon to the Smart Switch/Bulb. I looked into the API for the smart switch app and how to obtain information about it such as the device ID, local key and IP address. I worked on making 5 more of the DIY flex sensors which we will sew on to the glove. Additionally, I started looking into how to send IR signals using a photon and converting the IR codes into the format the photon can use.

Materials Lists

Home Assistant Sub-Project

  1. Particle Photon – $19.00 (1)
  2. Flex sensor – 4.5 inches – $12.95 (1)
  3. Flex sensor – 2.5 inches – $7.95 (1)

*We decided to go ahead with more of the DIY flex sensors. So we might possibly need more velostat and copper sheets and conducting thread.

SRF Sub-Project

Already purchased / owned

  1. Glove for prototype [final version subject to change based on prototype]
  2. Sparkfun IMU – $14.95 (1)
  3. Flex Sensor – 4.5 inches  – $15.95 (1)
  4. ESP32 Dev Board – $15.00 (1)
  5. High Torque Micro Servo – $9.95 (3)
  6. Resistive Force Sensor – $7.00 (1)
  7. Flex sensor – 4.5 inches – $12.95 (1)
  8. 3D printed  SRF – ~$9.00 (N/A)

Need to Purchase / Being Shipped

  1. Resistive Force Sensor – $7.00 (5)
  2. Flex sensor – 4.5 inches – $12.95 (3) and/or Flex Sensor 2.5 inches – $7.95 (8)
  3. Glove [Final design] – $14.99 (1 ordered)
  4. PCBs – N/A (N/A ordered)
  5. 3.3V to 5.0V Level Shifter IC – ~$1.00 ( 1)

Areas of Concern

Curt –

Falling behind on the glove portion. Need to just build all of the sensors and get them mounted on the glove along with the IMU. Also, I need to work through the issues with the finger that the prototype demonstrates. Some of these may not be addressed by the showcase as I would need to test alternate approaches to find the best. One important note in particular, is that I am going to need another servo in order to get a 4th degree of freedom.

Shruthi –

The particle photon community is not very extensive and hence debugging has become quite challenging as you run into new errors.

Vedant –

I was able to get the device ID and IP address but I am having trouble getting the local key for the smart switch. I did some more research and found couple of other ways to get it, so I will be working on that next week. Additionally, I was having trouble finding a IR code converter (from HEX to raw) for the IR codes for my TV, so I’ll have to look a little more into that as well.

Project Pots 5: Lighting Jacket

Project Title: Light Up Jacket (“You are hot but you are cool”)

Project Team: Obasi, Jack

Weekly Accomplishment:

Obasi:

Worked on the sample jacket.

Search for materials and fabrics.

Design pattern for the jacket.

Jack:

Searched for ways to light.

Wrote basic code for Playground Express.

Purchased lights for the jacket. 

Found a way to light up the wires and circles. 

Combine lighting effect with Obasi’s material and produce cool effects.

Have NeoPixels light up in different ways

Images

Code function: if the more pixels light up when the sound is louder (only if the sound is above threshold)

Changes to our approach

  1. We will try to make a light jacket (perhaps with less stuffing), so people can wear it indoor
  2. We will try to make it with transparent fabric so that the lights can have a glowing effect
  3. For now, instead of detecting the bass, we will detect loud sound since bass can be very tricky to detect
  4. We will add a “bounce” feature so that when the performer jump on stage the color changes as well
  5. We decide to make a vest instead of a jacket since a vest can be worn indoor and look cool at the same time.
  6. We decided to use the RGB NeoPixel as our primary way of lighting. We also design a pattern of where our lights would go

Material List

El Wire:

Blue, Green, Orange & Yellow colorways

$1.35 Each

6 wires in total

https://www.ellumiglow.com/electroluminescence/electroluminescent-wire

Neon Pixel Strip

LED light

$12.5 Each

0.5m – 2m

https://www.adafruit.com/product/3811?gclid=CjwKCAiAiJPkBRAuEiwAEDXZZdN0k6gopEcaCGBKvVWR_YBFFRyOOqmAiFx3_1TthxETDxXecGo_ZhoCfAwQAvD_BwE

Mini Skinny Neon Pixel Strip

mini LED light

$24.95 Each

1m – 2m

https://www.adafruit.com/product/2964?length=1

Lighting Tape Strip

Tape Strip

$8.95 Each

2 – 3?

https://www.adafruit.com/product/415?gclid=CjwKCAiAiJPkBRAuEiwAEDXZZQ3VhhcbDMvufS2GybwBge1zBLfJYWrOkZuZkYsYJYpU8I2vnJNpxRoCb5oQAvD_BwE

Lithium Ion Polymer Battery

Battery

$10 Each

2

https://www.adafruit.com/product/258

Areas of concern

We are trying to figure out how to light up the entire jacket and control the patterns with one playground express


Project Post #5: Flow

Project title: Flow

Team: Julia Kosier & Yiting Liu

Accomplishments

Julia:

  • Troubleshooted the code for the RGB LEDs; got basic test of LEDs operational

Yiting:

  • Printed out 3d design in College library and reconstructed the design and print at college library
  • Spray painted and adhere cellophane on top of the wings
  • Brainstormed the design for the sleeves to attach the color sensor


images

3d printing of the holder of led lights, optical fibers, and a microcontroller in Blender with recalculated dimensions – College Library cost: $24

Spray Painted Wings

Part/Material Price Quantity Link to a purchase location
1 Side Glow Fiber Optic Cable 1.5mm~8mm Optical Fiber For Lighting Decorations

[1.5mm for 15 meters]

$15.99 w/o tax 1 https://www.ebay.com/itm/Side-Glow-Fiber-Optic-Cable-1-5mm-8mm-Optical-Fiber-For-Lighting-Decorations/253189403496?ssPageName=STRK%3AMEBIDX%3AIT&var=552285229283&_trksid=p2057872.m2749.l2649
2 Color sensor $7.95 1 https://www.adafruit.com/product/1334
3 16 gauge floral wire $11.99 1 https://www.amazon.com/gp/product/B00T831TFA/ref=ppx_yo_dt_b_asin_title_o00_s00?ie=UTF8&psc=1
4 Fabrics $3.99/yd

Including shipping total is $14.18

2 yards https://www.fabricwholesaledirect.com/products/sheer-voile-fire-retardant-fabric?gclid=Cj0KCQiAk-7jBRD9ARIsAEy8mh7xxCRl9hFRSNDtoD39ELNlrFHEVmJTnGmABucK8v3UQuPzZhtuZJoaAgeFEALw_wcB&fbclid=IwAR34tdd2dbImfbFrF7y8HEeAAJFUZJpFmekLj1aYBwW7GRi0Cw8Gx2MD5G4
5 Cellophane $15.99 1 https://www.amazon.com/gp/product/B07GR4NCC9/ref=ppx_yo_dt_b_asin_title_o01_s00?ie=UTF8&psc=1
6 Heat spray $5.77 1 https://www.amazon.com/gp/product/B000PCWRMC/ref=ppx_yo_dt_b_asin_title_o02_s00?ie=UTF8&psc=1
7 Elastic $.60/foot 10 feet https://www.strapworks.com/Elastic_p/e.htm
8
9


Areas of concern:

  • We need sleeve design support to make sure the movement of the right arm won’t affect the circuit attached on the back with the wings.