Project Post #4- InGlove

Weekly accomplishments:


Curt:

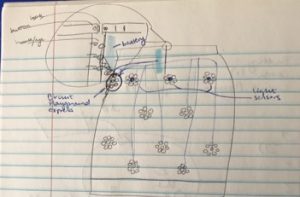
This week I started 3D printing the finger. The servo mountings were printed along with the fingertip. However, the printer broke so I was unable to print the hinges and finger interconnect pieces. I am going to be reaching out to the library for printing if the 3D printer I was using is still broken. On another note, the finger construction is proceeding with fair results for a first prototype. I have been working on preparing the parts to screw into each other. In the next week I plan on printing the rest of the finger and get the initial prototype constructed. I will also be shopping for a wrist / hand brace that I can use for the purposes of providing a soft yet sound base for the finger.

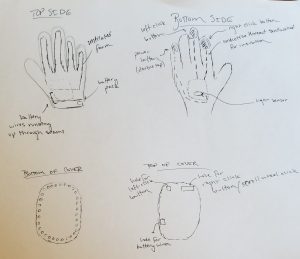
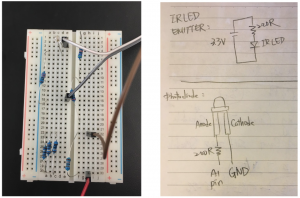
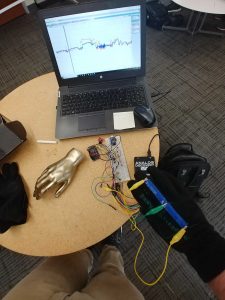
I have also pursued the custom flex sensor that Shruthi and Vedant worked on last week. Specifically, I have produced two flex sensors joined by a central node in order to capture flex for two different joints in a finger. My next steps on this portion are to purchase a glove liner, construct flex sensors for fingers, sew on flex sensors, and start capturing hand data.
For the algorithm to convert gesture into finger joint position, I still need to work out the specifics. To discuss this, I first must detail the two applications of the finger that I have in mind. The two applications are an assistive grasping device and a hand-remapping device. For an assistive grasping device, as labeled cluster may be enough to understand what the intention is, then using that as a look up for rough location of the thumb. For example, open hand will cause full open of finger, full close will result in finger being fully bent. It is not entirely clear on the mapping for other gestures but using Asada’s previous work, I would constrain the clustering to the thumb and first two fingers on the user’s hand. An alternate approach is to attempt full hand clustering and augment the predicted values with the artificial synergies from Asada’s work. As for hand remapping this, whereby the thumb and first two fingers are considered a distinct hand from the last two fingers and SRF thumb, I plan on using artificial synergies as a direct signal to the SRF digit.

Future work using human computation to help define the gesture to finger data and future work on a physical therapy procedure for hand remapping is needed but will not be explored by end of course.

Vedanth:

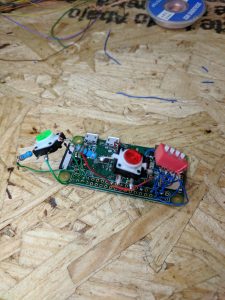
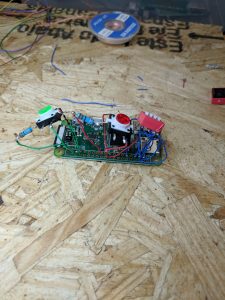
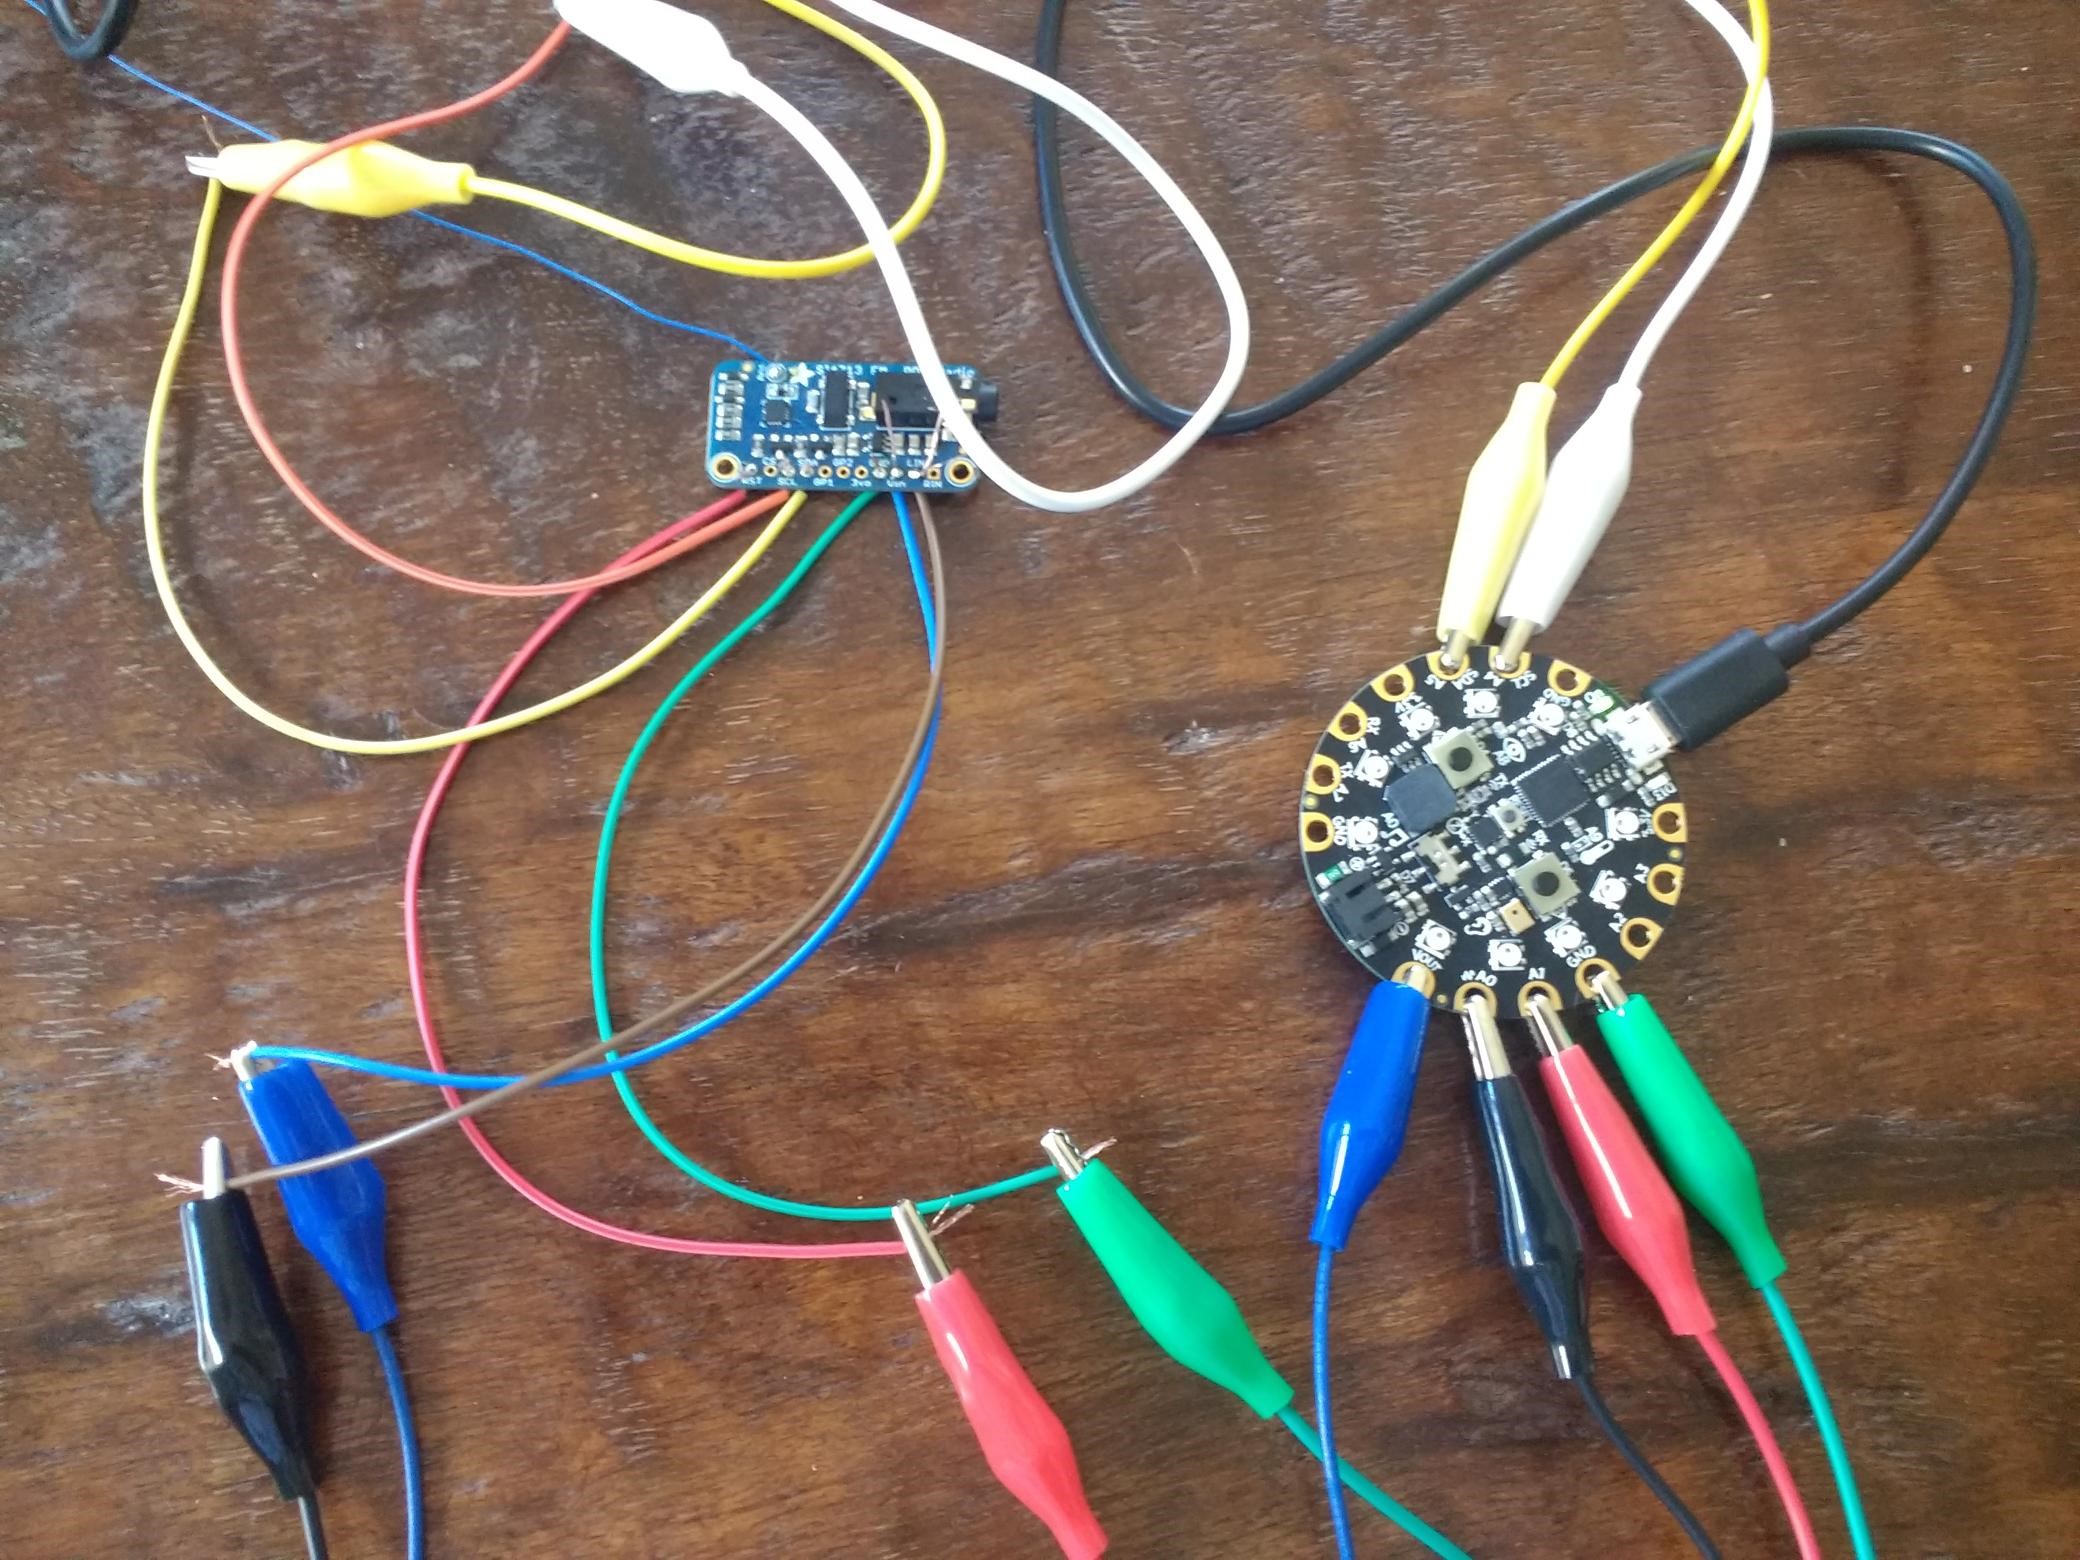
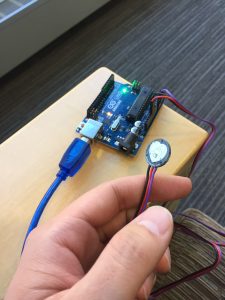
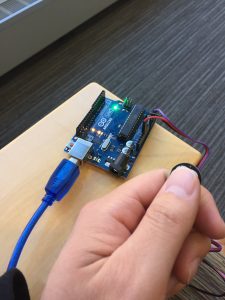
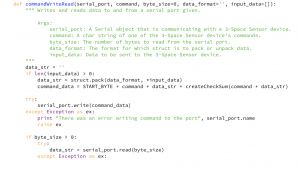
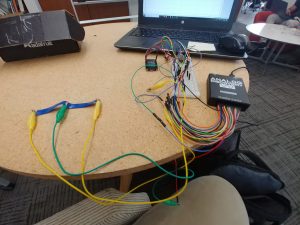
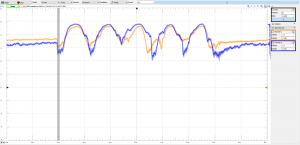
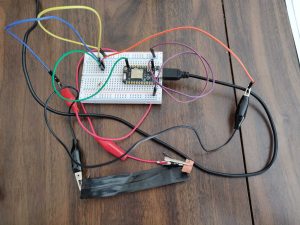
This week we did some more testing with the DIY and the Adafruit flex sensors. We realized the two have very different resistances, so we needed different resistors in our circuit to test them. I was also able to use the Particle and connect it to the IFTTT app (which connects to smart switches). We were able to write a program that publishes an ‘event’ when the flex sensor is bent, which is then read by IFTTT, which then indicated the smart plug app turn the smart plug on. However, there was a large delay during this process, as the IFTTT app checks for the published event only once every minute. So we are starting to look into other options, such as making our own Android app which transmits the information from the published event to the smart plug app. I am looking into how the Particle will send/receive information from the Android app directly.


Shruthi:

This week me and Vedant worked on trying to build a pipeline from the flex sensor to end devices using IFTTT. We did manage to successfully connect sensor data to a smart plug via IFTTT and a smart plug app. However, what we noticed was that this pipeline requires multiple reads and pings to the server and there was no guarantee of immediate service. This implied that the latency between a flex and the task was high. We went ahead to debug the what is causing the lag and realized that although particle photon uploads data to the cloud pretty quickly, IFTTT was slow in reading data from the particle servers. Another constraint was that IFTTT does not allow communicating to the google assitant, however it allows communication from the google assistant(Which is not what we want). Customization on IFTTT is very restricttive and hence we plan to use the cloud API exposed by particle photon and to build our own android application. This maybe involve bit of a learning curve and I am looking into it.

Materials List

Home Assistant Sub-Project

  1. Particle Photon – $19.00 (1)
  2. Flex sensor – 4.5 inches – $12.95 (1)
  3. Flex sensor – 2.5 inches – $7.95 (1)

*We decided to go ahead with more of the DIY flex sensors. So we might possibly need more velostat and copper sheets and conducting thread.

SRF Sub-Project

Already purchased / owned

  1. Glove for prototype [final version subject to change based on prototype]
  2. Sparkfun IMU – $14.95 (1)
  3. Flex Sensor – 4.5 inches  – $15.95 (1)
  4. ESP32 Dev Board – $15.00 (1)
  5. High Torque Micro Servo – $9.95 (3)
  6. Resistive Force Sensor – $7.00 (1)
  7. Flex sensor – 4.5 inches – $12.95 (1)

Future / After initial prototype

  1. Resistive Force Sensor – $7.00 (5)
  2. Flex sensor – 4.5 inches – $12.95 (3) and/or Flex Sensor 2.5 inches – $7.95 (8)

Areas of concern:

For areas of concern, the only major concern right now is time to get everything complete but mainly the algorithm, as I need to understand the signal to noise ratio in my data, the precision of the finger, etc. before I can determine the best course of action

Project Post #4: Michael Leykin

Project Title: Penetration of Endpoints and Networks Infiltration System

Project Team: Me, myself and I

Weekly Accomplishments + Images:

Finished Soldering For Bash Bunny:

All soldering DONE!

Spent time this weekend, building my rouge WiFi network and got it to work and have an idea to make it mobile:

Material List:


Part

Price Quantity Link
wireless network adapter $28.50 1 https://www.amazon.com/gp/product/B0035OCVO6/ref=ppx_od_dt_b_asin_title_s01?ie=UTF8&psc=1
Ethernet cable $3 1 https://www.amazon.com/AmazonBasics-RJ45-Cat-6-Ethernet-Patch-Cable-5-Feet-1-5-Meters/dp/B00N2VILDM/?tag=whtnb-20
Raspberry Pi 3 or 3 B+ $38.10 1 https://www.amazon.com/ELEMENT-Element14-Raspberry-Pi-Motherboard/dp/B07BDR5PDW/?tag=whtnb-20
microSD card $6.85 1 https://www.amazon.com/SanDisk-microSDHC-Standard-Packaging-SDSQUNC-032G-GN6MA/dp/B010Q57T02/?tag=whtnb-20
power source (Enokay Power Supply for Raspberry Pi 5V 2.5A Micro USB Charger Adapter with On Off Switch) $8.59 1 https://www.amazon.com/Enokay-Supply-Raspberry-Charger-Adapter/dp/B01MZX466R/?tag=whtnb-20
USB keyboard/mouse interface (Rii Mini Wireless 2.4GHz Keyboard with Mouse Touchpad Remote Control, Black (mini X1)) $16.99 1 https://www.amazon.com/gp/product/B00I5SW8MC/?tag=whtnb-20
SD card adapter $7.99 1 https://www.amazon.com/Vanja-standard-Connector-Notebooks-Smartphones/dp/B00W02VHM6/?tag=whtnb-20
Raspberry Pi Zero Wifi $10.00 1 https://www.adafruit.com/category/933?src=raspberrypi
Pi Zero USB Stem $5.00 1 https://shop.pimoroni.com/products/zero-stem-usb-otg-connector
2 x Tactile Push Button Switch With LED lights $3.00 1 https://www.aliexpress.com/item/5PCS-1-set-12X12X7-3-Tactile-Push-Button-Switch-Momentary-Tact-LED-5-Color-12X12X7-3mm/32873551440.html?spm=2114.search0104.3.2.3b0241a0ILdgzL&ws_ab_test=searchweb0_0,searchweb201602_5_10065_10130_10068_10890_10547_319_10546_317_10548_10545_10696_453_10084_454_10083_10618_10307_537_536_10902_10059_10884_10887_321_322_10103,searchweb201603_58,ppcSwitch_0&algo_expid=0747bf75-f245-43c5-a0c1-4966ea4078a8-0&algo_pvid=0747bf75-f245-43c5-a0c1-4966ea4078a8&transAbTest=ae803_5
DIP switch with 4 switches $3.00 1 https://www.aliexpress.com/item/10pcs-lot-Slide-Type-SMT-SMD-Dip-Switch-2-54mm-Pitch-2-Row-4-Pin-2/32956815576.html?spm=2114.search0104.3.3.4c971641sXqPaV&ws_ab_test=searchweb0_0,searchweb201602_5_10065_10130_10068_10890_10547_319_10546_317_10548_10545_10696_453_10084_454_10083_10618_10307_537_536_10902_10059_10884_10887_321_322_10103,searchweb201603_58,ppcSwitch_0&algo_expid=60dfe6ec-dd9e-4db7-93f0-5f94aec30ef4-0&algo_pvid=60dfe6ec-dd9e-4db7-93f0-5f94aec30ef4&transAbTest=ae803_5
2 x 330R resistors HAVE 1
MFRC522 RFID reader module $5.49 1 https://www.amazon.com/gp/product/B01CSTW0IA/ref=ppx_od_dt_b_asin_title_s01?ie=UTF8&psc=1
MIFARE 1K RFID card (with changeable UID, 13.56Mhz) Included 1
some RFID card to copy (only 13.56Mhz cards can be read/written by this particular card reader module) Included 1
Tactile Touch Push Button Switch Tact Switches 6 X 6 X 5mm Included 1
LEDs (red, yellow, green) + resistors (1k ohm) $7.00 1 https://www.amazon.com/gp/product/B01ER728F6/ref=ppx_od_dt_b_asin_title_s02?ie=UTF8&psc=1
3 AA batteries (1.5V each) HAVE 1
2 zener diodes (3.7V) or (3.6V) $8.00 1 https://www.amazon.com/gp/product/B07BTKVRG8/ref=ppx_od_dt_b_asin_title_s01?ie=UTF8&psc=1
switch (3 Terminals ON/ON 2 Positions SPDT Electronic Push Button Sliding Switches) $5.00 1 https://www.amazon.com/gp/product/B0799R529Z/ref=ppx_od_dt_b_asin_title_s02?ie=UTF8&psc=1
cables, hot glue, tape (30AWG Insulated Silver Plated Single Core Copper PCB 0.25mm Kynar Wrapping Wire) $5.00 1 https://www.amazon.com/gp/product/B07M7BHKRV/ref=ppx_od_dt_b_asin_title_s01?ie=UTF8&psc=1
Arduino Pro Micro 5V $20.89 1 https://www.amazon.com/gp/product/B01MTU9GOB/ref=ppx_yo_dt_b_asin_title_o04_s00?ie=UTF8&psc=1
PCB Prototyping Board $10.00 1 https://www.amazon.com/gp/product/B072Z7Y19F/ref=ppx_od_dt_b_asin_title_s02?ie=UTF8&psc=1
Solder Gun $67.98 1 https://www.amazon.com/gp/product/B01MDTO6X7/ref=ppx_yo_dt_b_asin_title_o06_s00?ie=UTF8&psc=1
Desoldering Gun and Desoldering Wick $7.69 1 https://www.amazon.com/gp/product/B07BB8DGMP/ref=ppx_yo_dt_b_asin_title_o07_s00?ie=UTF8&psc=1
Battery Pack For Raspberry Pi 3 B+ $25.25 1 https://www.amazon.com/gp/product/B07BSG7V3J/ref=ppx_yo_dt_b_asin_title_o02_s00?ie=UTF8&psc=1

Areas of Concern:

I am having trouble making my rouge wifi network fast enough to connect to with just the internal wifi adapter and external adapter alone, I am looking into solution but I could use some advice here. I will be doing the software for the rest of my devices this week so I am sure I will run into problems there as well.

Project Post #4: Virtual Vermin

Virtual Vermin

Jeff Brandt


Weekly Accomplishments:

  • Planned out integration of all components in more detailed drawing
  • Prototyped connections for fingertip buttons to existing circuit board


Images:

Material List:

Wireless Mouse // Quantity: 1 // $9.99 // https://www.amazon.com/gp/product/B015X2OD52/ref=ppx_yo_dt_b_asin_title_o00_s00?ie=UTF8&psc=1

Conductive Fabric // Quantity: 1 sq. ft. // ? // Supplies in classroom

Conductive Thread // Quantity: 2 yds. // ? // Supplies in classroom

Negative Poisson Ratio Foam // Quantity: 1 sq. ft. // Free // Supplied by my research lab

Gloves // Quantity: 1 // $11.95 // https://www.amazon.com/Agloves-screen-gloves-texting-gloves/dp/B004A9FI2M/ref=sr_1_6?keywords=thin+glove&qid=1552266834&s=electronics&sr=1-6

Adafruit Circuit Playground // Quantity: 1 // Supplied // Already given in class

Short Flex Sensor // Quantity: 1 // $7.95 // https://www.adafruit.com/product/1070

Membrane LED Keypad // Quantity: 1 // $2.95 // https://www.adafruit.com/product/1333

Round Force Sensitive Resistor // Quantity: 3 // $7.00 // https://www.adafruit.com/product/166

Small Piezo Touchpad // Quantity: 3 // $0.95 // https://www.adafruit.com/product/1740

3D printed cover for circuit board // Quantity: 1 // ? (Depends on final print) // creating in Solidworks


Areas of Concern:

After prototyping the connections to circuit board, the area I am most concerned with is actually integrating all components into the physical glove. It isn’t a major concern and will most likely just take some trial and error.

Project Post #4: ROETE

Radio Outdoor Emergency Transmitter Electronic (ROETE)

Natalie Tack

Image:

Weekly Accomplishments:

I soldered the inputs on the radio module. Kevin suggested that this may help the connection, as the audio was only playing out the speaker and not over the radio. This did help a lot, so thank you Kevin! The audio now comes out both the speakers and over the radio. This really is not a big concern that it comes out of two places, at the end of this project, if I have time I figure out how to disable the speaker.

I also got in contact with a company located in Sun Prairie who say that I can bring in my patch design and they can make it for me for $10. They just say it is not going to be a traditional patch and I have to bring in my own piece of fabric. I might have some questions about this.

Material List:

    1. FM Stereo Radio Transmitter (already purchased and in use)
      1. Price: $20
      2. Quantity: 1
      3. Link: https://www.amazon.com/Adafruit-Stereo-Transmitter-RBDS-Breakout/dp/B00SK8ME4Y#
    2. GPS Module
      1. Price: $40
      2. Quantity: 1
      3. Link: https://www.adafruit.com/product/746
    3. Vibration Module
      1. Price: $2
      2. Quantity: 1
      3. Link: https://www.adafruit.com/product/1201?gclid=EAIaIQobChMI36npo8Hz4AIVDYdpCh2TdwvHEA
    1. Patch
      1. Price: $10
      2. Quantity: 1
      3. Link: http://eliteembroideryandscreenprinting.com/


  1. Concerns:

    Mentioned above, I just have one question. What type of fabric should I bring in to get the patch sewn on (at the Sun Prairie company)? I also don’t know how long it will take for them to sew the patch, so I should get my design to them as soon as possible.

Project Post #4

Project Title 

Heart Rater

Project  Team

Sungjin (SJ) Park

Weekly Accomplishments

  • code for functionality is completed
  • tested if the sensor works as I intended

Image

Material List 

  • Pulse Sensor (Heart-Rate Monitor)
  • Price: $24.99
  • Quantity: 1
  • Link to a purchase location:  https://shop.openbci.com/products/pulse-sensor?utm_medium=cpc&utm_source=googlepla&variant=22543672899&gclid=Cj0KCQjwjpjkBRDRARIsAKv-0O12qE-56tiH7XDqo-T9Cz1l4Yf1ybwdN9RlAyg_Nkxs_yUG0b9LqbsaAkcxEALw_wcB


Areas of Concern

  • I need extra Bluetooth device for the sensor to indicate heart bpm on the phone. With the Bluetooth device, however, the glove would get much bulkier than I intend it to be. So I am thinking about making built-in led in the Arduino to blink on the beat of heart rate, instead of displaying on the phone.

Project Post #4

PROJECT POST #4

Project Title: Vis Hat  

Project Team: Lydia, Fu, Jay, Sharon

Weekly Accomplishments:

Lydia:

  • Researched: data collection tests/experiments to detect data quality and collection; fNIRS data collection and analysis software; prefrontal cortex data and emotional correlation; applications for fNIRS testing to come up with other possible applications for the final project presentation
  • Started drafting a testing experiment procedure
  • Downloaded brain data analysis and gathering software, researching this and how to use it
  • Starting to draft prototype designs for 3D printed component

Fu:

  • Hardware testing, both emitters and photodiodes.
  • Wiring through breadboard, debugging and checking circuit design.
  • Checking the photodiode analog reading works.

Jay:

  • Power to both emitter and sensor
  • Started on code for analog reading from the sensor
  • Read signal through finger to complete proof of concept (detect signal passing through skin, blood and bone)

Sharon:

Images:

The following images show the actual testing circuit for the emitters and sensor, with a quick note about the diagram of the testing circuit.


Material List:

title/link # needed price/unit notes shipping and tax TOTAL PRICE:
arduino due 1 34.43 34.43
NPN transistor 1 5.99 this one unit contains ~200 resistors 5.99
730nm emitter 2 8.61 9.54 26.76
850nm emitter 2 1.46 2.92
850 max nir detector/sensor 2 5.37 9.02 19.76
bluetooth 1 28.95 RN41XVC (with chip antenna) 8.81 37.76
850nm emitter 2 1.46 To account for trial and error hardware testing 7.99 9.45

Project Concerns:

One potential concern might account for how much troubleshooting we will have to do with planning out and executing hardware and software. Considering we only have 5 weeks left, we might want to come up with additional plans for the application of the final project presentation. Below are a few initial ideas, but we may add to this list in the future. This concern isn’t too pressing now, as we have a few more initial technical aspects to develop, but initializing these ideas now could be a good idea and as our project continues to progress, the ideas could help how we navigate things in the future.

A folder in our group’s shared google drive has been created to come up with additional potential backup plans. So far, we are on track and excited about our progress so we are planning on following through with our plan as is.


Post 3: Lit Lehenga

Individual: Jessica Fernandes

Weekly accomplishments:

  • ordered materials (except light sensors)
  • brought final garment to Madison (36 medallions in pattern)
  • updated plan for how to integrate hardware into garment

Image:

Updated Sketch of design

Materials

Areas of concern

  • Calibrating the photoresistors
    • practice and see if I prefer photoresistor or additional light sensors

Project Post #3

Safe Sleeve

Jake Cordover

Weekly Accomplishments:

All materials have been sourced and ordered. I have received the knee sleeves, just waiting on the sensors. I had been debating on whether to go with the all in one Yost sensors, or to go with less expensive IMU’s with microcontrollers, batteries, and wires, and I have decided to go with the Yost integrated sensors. While significantly more expensive, I believe they will be much more conducive in realizing the vision of this project, to create a seamless, functional knee sleeve.

While I don’t have the sensors on hand yet (hopefully early this week), I have looked at the manuals and read up on how I will interface with the sensors. It looks to be a fairly straight forward process and there is some source code available for this that I have located.

Additionally, I have continued to study vector mathematics. While there is a straight forward way to calculate the flexion/extension angle from the vectors the sensors return, quaternions potentially provide a means of more accurate data, thus I have continued to look at using these.

Images:

Below is some source code I found that will be of use when it comes to connecting to the sensors and reading/writing.

Materials:

Part/Material Price ($) Quantity Link
Potential IMU 1 117 with discount secured 1 https://yostlabs.com/product/bluetooth-mini/
Potential IMU 2 76 1 https://mbientlab.com/store/metamotionc/
Knee Sleeve 1 16.97 1 https://www.amazon.com/PowerLix-Compression-Knee-Sleeve-Basketball/dp/B01MQYADOT/ref=sr_1_5?keywords=powerlix+knee+sleeve&qid=1552264456&s=gateway&sr=8-5
Knee Sleeve 2 20 1 https://www.amazon.com/Zensah-Knee-Compression-Sleeve/dp/B00GPU7QRO/ref=sr_1_6?keywords=zensah+knee+sleeve&qid=1552264496&s=gateway&sr=8-6#customerReviews
3D printing

and associated costs

TBD TBD TBD

Areas of concern:

An area of concern regards anchoring the 3d printed housing to the sleeve. As the sleeves are compression and stretchy, I’m not sure how this will affect the anchoring stitching when the sleeve is being worn and stretched out. I need to make sure it will still be structurally sound enough, or I will need to start pursuing other methods of attachment, like a pocket. I have two sleeves to choose from, so hopefully one will offer a viable solution.

Otherwise, my understanding of quaternions is not sufficient if I choose to go this route, however I will continue to study up on this matter.

Project Post 3

Circular Pleating

  • weekly accomplishments list what you accomplished for each team member

This week, I acquired the Polyester fabric for the first circular garments. I also drafted a digital pattern for a skirt, and did research into laser cutting polyester.


  • changes to your approach after presenting your work what changes have you made in your approach

I decided to do a smaller garment made of 2 yards of fabric before making a large gown with the remaining 10 yards.

  • material list For each material fill out the following information (a table may be a good way to do this)
    • Part/Material
      • Polyester
    • Price
      • 2.37 per yard
    • Quantity
      • 12 yards
    • Link to a purchase location
      • https://www.fabricwholesaledirect.com/products/chiffon-fabric

Nothing has changed since the last project post. I have done a little research into nonwoven silks etc. but I have alot of handwork to do to do pleating